
Step 4
- Make
- Mazda
- Model
- MX-5 (NA) Factory Workshop Manual
- Year
- 1990–1992
- Section
- U Heater and air conditioner systems › Step 4
Heater and air conditioner systemsStep 4
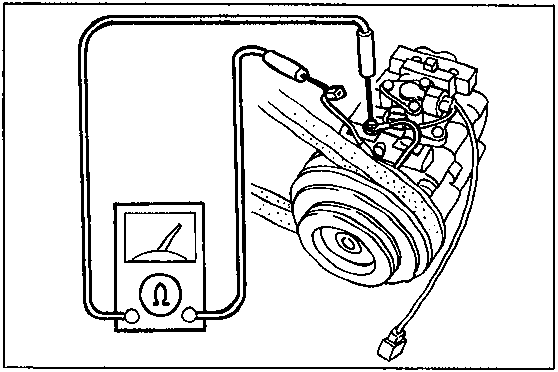
Step 4
- Disconnect the magnetic clutch connector.
- Check for continuity between the magnetic clutch connector and a body ground.
Note
• Set the ohmmeter to x1,000 range.
- If there is no continuity, replace the magnetic clutch.
- If there is continuity, adjust the magnetic clutch clearance or check the compressor for internal trouble.
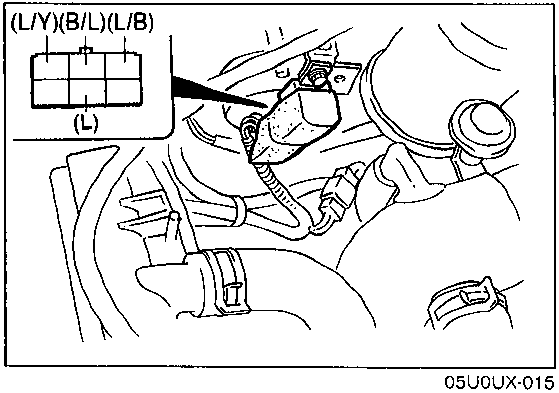
Step 5
- Start the engine.
- Turn the blower and A/C switches ON.
- Measure the voltage at the following terminal-wires of the A/C relay connector.
| Wire | Voltage | Action |
|---|---|---|
| (B/L) | 12V | Go to Step 6 |
| 0V | Next, check wire (L/Y) | |
| (L/Y) | 12V | Next, check wire (L/G) |
| 0V | Repair wire (L/G) (AD FAN 20A fuse—A/C relay) | |
| (L) | 12V | Next, check wire (L/B) |
| 0V | Repair wire (L/G) (WIPER 20A fuse—A/C relay) | |
| (L/B) | 12V | Check ECU terminal voltage |
| 0V | Replace A/C relay |
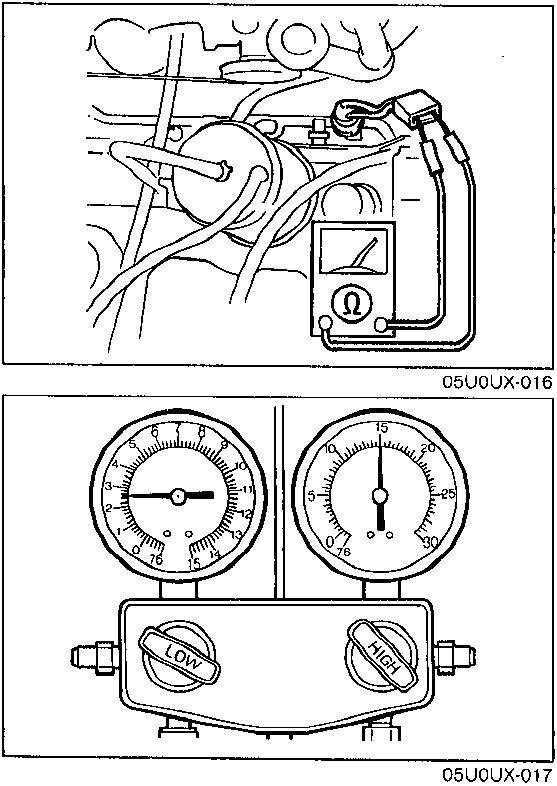
Step 6
- Disconnect the refrigerant pressure switch connector.
- Check continuity of the refrigerant pressure switch.
| Continuity | Action |
|---|---|
| Yes | Repair wiring harness (A/C relay—Refrigerant pressure switch—Magnetic clutch) |
| No | Go to Step 7 |

Step 7
- Measure the refrigerant pressure. (Refer to page U–31.)
Normal pressure
Low-pressure side:
147—294 kPa (1.5—3.0 kg/cm², 21—43 psi)
High-pressure side:
1,177—1,619 kPa (12.0—16.5 kg/cm², 171—235 psi)
- If not as specified, check the refrigerant system by referring to the troubleshooting information on page U–12.
- If correct, replace the refrigerant pressure switch.
Parts & tools for this job For 1990 Mazda MX-5
- TOOLA/C manifold gauge setSearch: AC manifold gauge set
- TOOLUV leak detection kitSearch: AC UV leak detection kit
- PARTCabin filterSearch: Mazda MX-5 1990 cabin filter
Links open Amazon search results in a new tab. As an Amazon Associate I earn from qualifying purchases.