
Galant VR4 AWD L4-1997cc 2.0L DOHC Turbo (1992)
b. Slowly push tensioner rod in, using the vise, until set hole (A) is aligned with hole (B) in the tensioner cylinder, Fig. 23.
c. Insert a wire .055 inch (1.4mm) in diameter into the set holes, then remove auto tensioner from the vise.
d. Install auto tensioner, tighten attaching bolt to specifications. Leave the wire installed in the auto tensioner.
10.
Install tensioner pulley onto tensioner arm, position the hole in pulley shaft to the left of the center bolt, then tighten center bolt finger tight.
11.
Rotate camshaft sprockets so that their dowel pins are located on top, then align the timing marks facing each other with the top surface of cylinder
head, Fig. 24. When exhaust camshaft is released, it will rotate one tooth in the counterclockwise direction. This should be taken into account
when installing timing belt on sprockets. The camshaft sprockets are interchangeable and have two sets of timing marks. When the sprocket
is mounted on the exhaust camshaft, use the timing mark on the right with dowel pin hole on top. For the intake sprocket, use the mark
on the left with dowel pin hole on top, Fig. 25.
12.
Align crankshaft sprocket and oil pump sprocket timing marks as shown, Fig. 26.
13.
With oil pump sprocket timing marks aligned, remove plug from lefthand side of cylinder block and insert a screwdriver with a shaft diameter of .3
inch. If screwdriver can be inserted 2.4 inches or more, alignment is correct. If screwdriver can be inserted only 1 inch, rotate oil pump sprocket
one revolution and realign timing marks. Then check to ensure screwdriver can be inserted 2.4 inches or more. This check is performed to ensure
silent shaft and oil pump sprocket are properly positioned. Leave screwdriver inserted in hole until after timing belt has been installed.
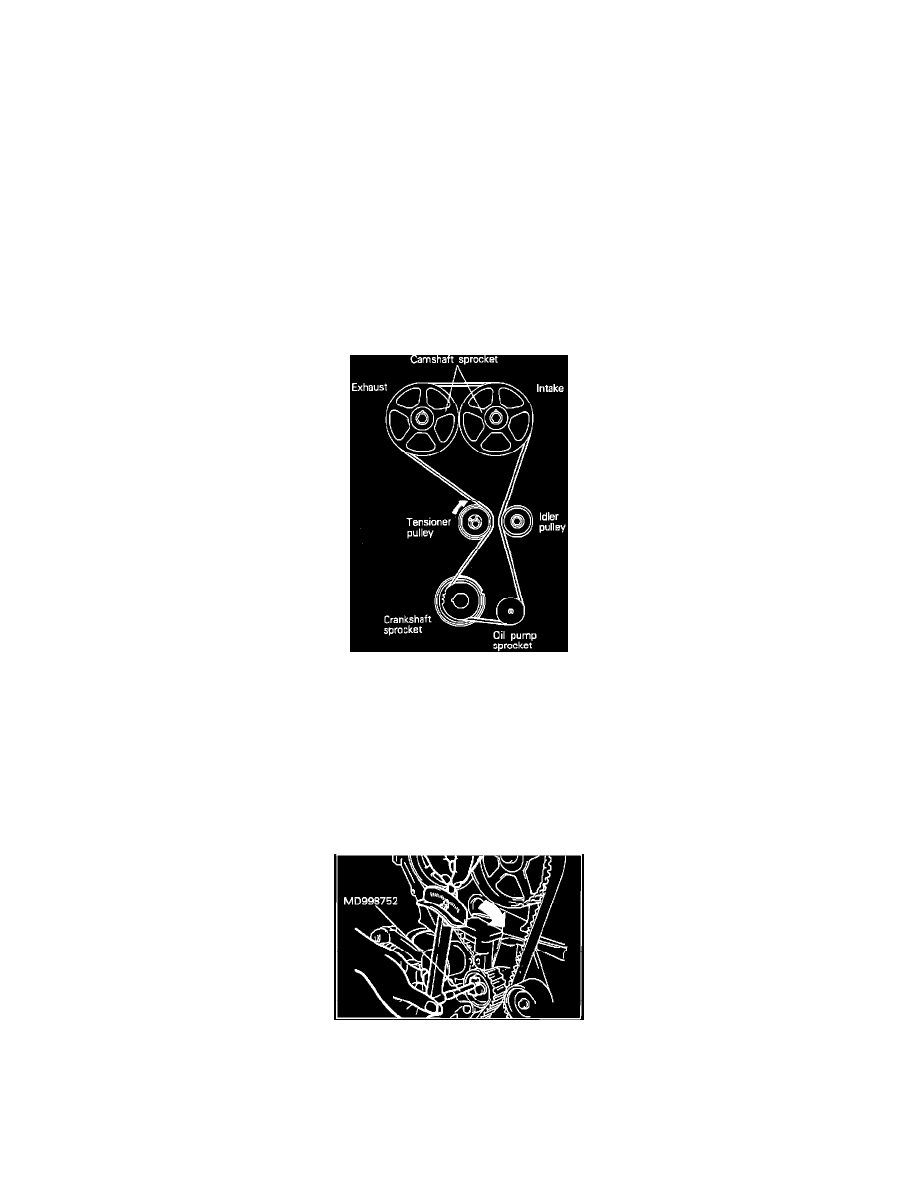
Fig. 27 Timing Belt Installation
14.
Install timing belt as follows:
a. Install timing belt around tensioner pulley and crankshaft sprocket, Fig. 27, and hold the timing belt onto the tensioner pulley with your left
hand.
b. Pulling timing belt with your right hand, install belt around oil pump sprocket.
c. Install timing belt around idler pulley, then around the intake camshaft sprocket.
d. Rotate exhaust camshaft sprocket one tooth clockwise to align timing mark with cylinder head top surface, then pulling the belt with both
hands, install around exhaust camshaft sprocket.
e. Gently raise tensioner pulley in direction shown by arrow in Fig. 27, so belt does not sag, then temporarily tighten center bolt.
Fig. 28 Tightening Tensioner Pulley Center Bolt