
Airbag and pre-tensioner, manual deployment
- Make
- Rover
- Model
- 200 Workshop Manual
- Year
- 1995–1999
- Section
- Precautions › Airbag and pre-tensioner, manual deployment
AIRBAG AND PRE-TENSIONER, MANUAL DEPLOYMENT
NOTE: Pre-tensioner deployment is done in car only.
If a vehicle is to be scrapped and contains an undeployed airbag module, or pre-tensioner, the components must be manually deployed. This operation should only be carried out using the following recommended manual deployment procedure.
Before deployment is started the deployment tool self test procedure should be carried out.
Deployment tool SMD 4082/1 self test procedure
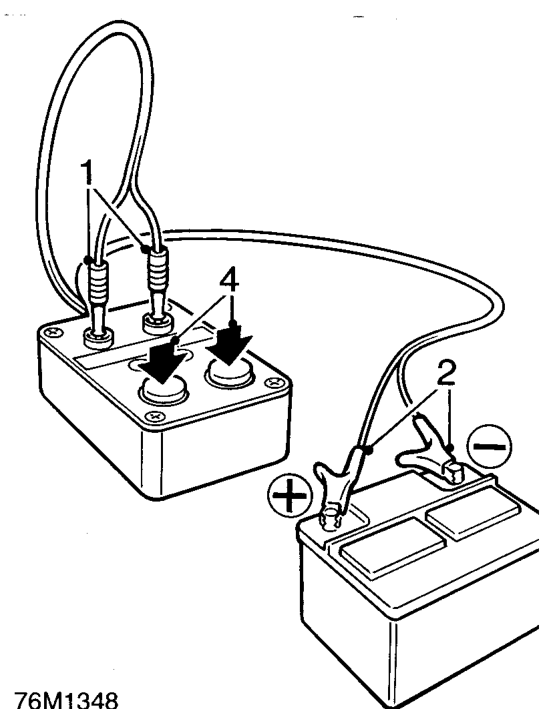
- Insert blue and yellow connectors of tool lead into corresponding sockets on face of tool.
- Connect crocodile clips of second tool lead to battery, red to positive and black to negative.
- Red "READY" light should illuminate.
- Press and hold both operating buttons.
- Green "DEFECTIVE" light should illuminate.
- Release both operating buttons.
- Red "READY" light should illuminate.
- Disconnect tool from battery.
- Disconnect blue and yellow connectors from tool face sockets.
- Self test now complete.
Deployment of pre-tensioner
These guidelines are written to aid authorised personnel to carry out the safe disposal of the pre-tensioner.
WARNING:
- Only use the Rover approved deployment equipment.
- Deploy pre-tensioner in a designated area.
- Ensure pre-tensioner is not damaged or ruptured before deploying.
- Notify relevant authorities.
- Carry out deployment tool self test.
- Slide seat fully forward to access pre-tensioner harness connector.
- Disconnect pre-tensioner harness connector.
WARNING: Ensure deployment tool SMD 4082/1 is not connected to battery.
- Connect flylead SMD 4082/5 to pre-tensioner connector.
- Connect flylead SMD 4082/5 to tool SMD 4082/1.
WARNING: Ensure pre-tensioner is secured tightly to seat.
- Connect tool SMD 4082/1 to battery.
WARNING: Ensure all personnel are standing at least 15 metres away from vehicle.
- Press both operating buttons to deploy pre-tensioner.
- Using gloves, remove pre-tensioner from seat and place pre-tensioner in plastic bag, and seal bag.
- Transport deployed pre-tensioner to designated area for incineration.
NOTE: DO NOT transport pre-tensioner in the vehicle passenger compartment.
Parts & tools for this job For 1995 Rover 200
- TOOLOBD2 scanner with SRSSearch: OBD2 scanner ABS SRS
- TOOLTrim removal tool kitSearch: trim removal tool kit
Links open Amazon search results in a new tab. As an Amazon Associate I earn from qualifying purchases.