
Brake light switch adjustment (Brakes)
- Make
- Rover
- Model
- 600 620 Diesel Repair Manual Supplement
- Year
- 1995–1999
- Section
- Adjustments › Brake light switch adjustment
BrakesBrake light switch adjustment
BRAKE LIGHT SWITCH ADJUSTMENT
Service repair no - 70.35.41
Adjust
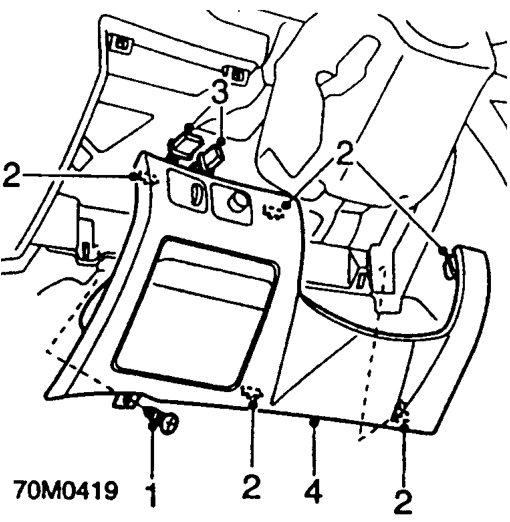
- Remove screw securing lower fascia closing panel to fascia.
- Release 5 clips securing lower fascia closing panel to fascia.
- Disconnect instrument illumination dimmer switch multiplug. Models fitted with headlamp levelling: Disconnect multiplug from headlamp levelling switch.
- Remove lower fascia closing panel.
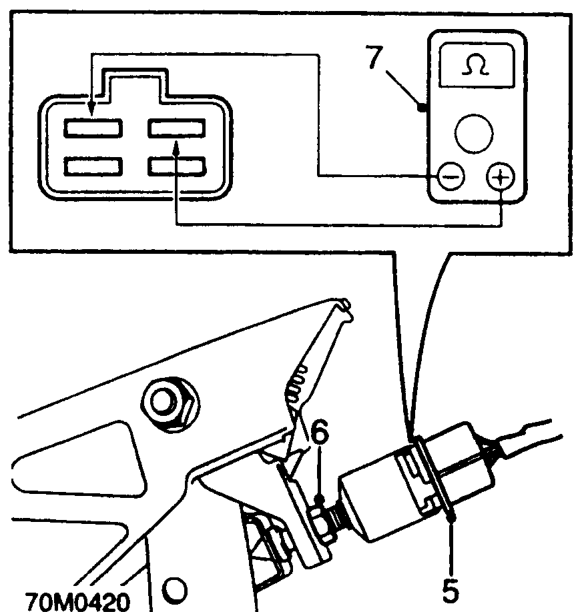
- Disconnect multiplug from brake light switch.
- Slacken brake light switch locknut.
- Connect an Ohmmeter across the GREEN/PURPLE (G/P) and PURPLE/PINK (P/K) terminals of brake light switch.
- Screw brake light switch into mounting bracket until an open circuit condition exists across the switch with the brake pedal released and a continuous circuit exists as soon as the pedal is depressed.
- Tighten brake light switch locknut.
CAUTION: Ensure the brake light switch does not prevent the brake pedal returning fully to its stop.
- Disconnect Ohmmeter and connect multiplug to brake light switch.
- Connect multiplug to instrument illumination dimmer switch. Models fitted with headlamp levelling: Position lower fascia closing panel and connect multiplug to headlamp levelling switch.
- Align lower fascia closing panel to fascia and press to secure retaining clips.
- Fit screw securing lower fascia closing panel to fascia.
Parts & tools for this job For 1995 Rover 600
- TOOLOBD2 scannerSearch: OBD2 scanner
- TOOLDigital multimeterSearch: automotive digital multimeter
- TOOLBack-probe test leadsSearch: back probe test leads
Links open Amazon search results in a new tab. As an Amazon Associate I earn from qualifying purchases.