seat Workshop Repair Guides

SEAT Workshop Service and Repair Manuals

Final drive: removing and installing > < Parking lock: dismantling and assembling
Fitting
Fitting
–  Fill the space between the lip seal and the dust guard with -G 052 128 A1- grease.
  Note!
With the gearbox removed, use tools -U-40450A/3- and -U-40450A/6- to fit the seal into the housing.
   
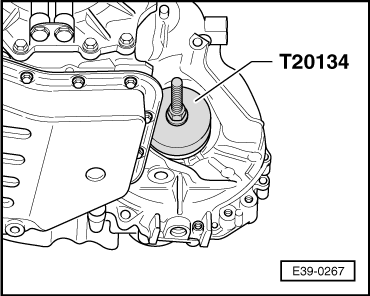
–  With the gearbox fitted, use tool -T20134- to fit the new seal, threading the spindle into the differential's threaded part.
–  Rotate the nut until the new seal is well fitted.
–  Fit the articulation flange with the spring, thrust washer, and conical ring.
  E39-0267
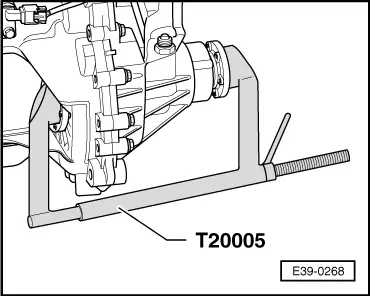
–  Fit securing bolt to articulation flange. Use tool -T20005- and tighten the bolt to 25 Nm.
Articulation flange oil seal, left
–  Place the driveshaft in the engine bay, and fit it into the wheel hub.
  E39-0268
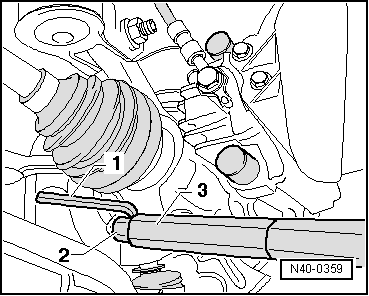
–  Fit the ball joint into the wheel bearing housing. Lock the ball joint with a Torx -T40- key and tighten the new self-locking nut to 20 Nm + 90°.
1 - Torx -T40- (shortened approx. 10 mm)
2 - -SAT 8010/18A-
3 - -SAT 8010-
  Note!
Make sure that the ball joint dust sleeve is not damaged or twisted.
Articulation flange oil seal, right
–  Fit the protective cover for the driveshaft, in case it is fitted, to the engine and tighten to a torque of 35 Nm.
Articulation flange oil seals, right/left
–  Fit driveshaft to gearbox flange and tighten bolts to 70 Nm in two stages (I - 10 Nm, II - 70Nm), with the correct spanner from tool -U-40020-.
–  Checking gearbox oil level → Chapter.
–  Install the insulation tray, if fitted: → Bodywork Repairs, installation work, exterior; Rep. Gr.50
–  Connect the earth battery strap.
  Note!
When the battery is re-connected, depending on which version, the vehicle equipment will have to be encoded.
  N40-0359

Final drive: removing and installing > < Parking lock: dismantling and assembling