seat Workshop Repair Guides

SEAT Workshop Service and Repair Manuals

Final drive, differential, differential lock > < Removing multi-function switch F125
Installing and adjusting multifunction switchF125
Installing and adjusting multifunction switch -F125-
   
–  Place multi-function switch -F125- on selector shaft.
Installation position
Groove -1- in selector shaft must line up with mark -2- on multi-function switch -F125-.
  N38-0170
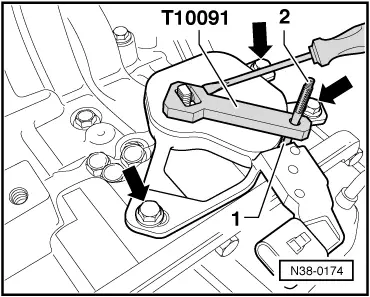
–  Tighten securing bolts -arrows- for multi-function switch -F125- until finger-tight.
–  Place setting gauge on selector shaft and secure it.
–  Move selector shaft lever on gearbox to position “N”.
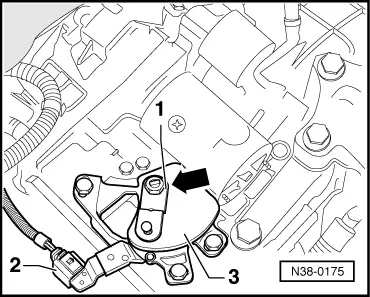
–  Turn switch so that dowel hole in switch housing -1- lines up with hole in setting gauge.
–  Push in dowel pin -2- of setting gauge.
–  Tighten securing bolts -arrows- for multi-function switch -F125- → Item.
  N38-0174
–  Push on connector -2- of wire for multi-function switch.
–  Push lever -1- onto selector shaft.
–  Tighten nut -arrow- → Item.
–  Install selector lever cable → Chapter.
–  Install battery and battery holder → Electrical system; Rep. Gr.27.
–  Bolt on coolant expansion tank.
–  Push connector onto coolant expansion tank.
  N38-0175
–  Install trim -2- for battery.
–  Install trim -1- for air duct -arrows-.
–  Reconnect earth strap to battery.
–  Code radio → Radio, telephone, navigation; Rep. Gr.91.
–  Initialise electric windows and set clock → Booklet10.1.
  E70-10039

Final drive, differential, differential lock > < Removing multi-function switch F125