seat Workshop Repair Guides

SEAT Workshop Service and Repair Manuals

Front door window > < Removing and installing screwed side window
Rear door window - removing and assembly
   
Rear door window - removing and assembly
Special tools and workshop equipment required
t  Torque wrench kit -SAT 8010-
t  Lever -T20043-
t  Plunger -T20087-
t  Lever -U 30800-

t  Removing → Anchor.
t  Install → Anchor.
Removing
   
–  Remove the cover -1- and the loudspeaker grille -2- using the lever -U 30800-.
  E64-10215
–  Remove bolts -1-.
–  Disconnect plug -3-.
–  Detach the lining upholstery -2- from above using the lever -T20043-.
–  Detach the lower fixings by pulling in the direction of the -arrows- and remove the cover of the upholstery.
  E64-10216
–  Disconnect the loudspeaker connector -arrow-.
  E58-10016
–  Remove the arrester -1- by pulling in the direction of -arrow A- and then in the direction of -arrow B- from its mount.
–  Remove the hook of the operating cable -2- of the interior door handle.
–  Slightly separate the exterior window seal of the rear door → Chapter.
  E70-0045
–  Undo the bolt -2- of the window frame -1-.
–  Remove the glass from the window frame -1-.
  E64-10218
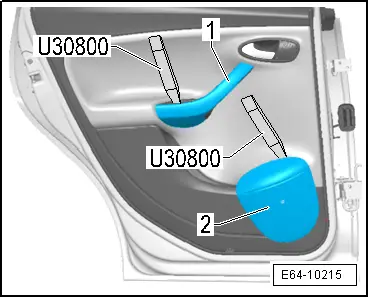
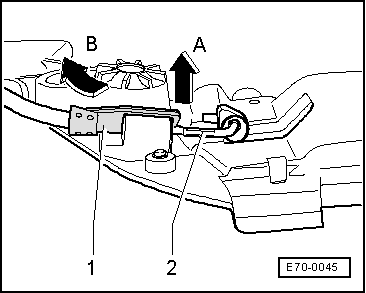
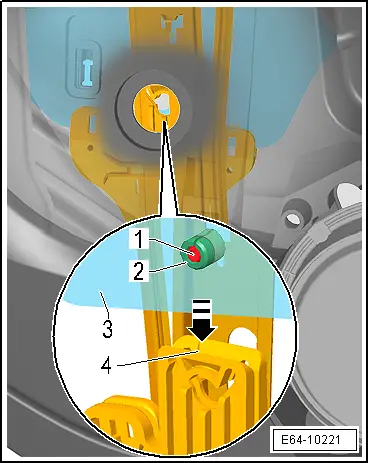
–  Remove the cap -3- using the lever -U 30800-.
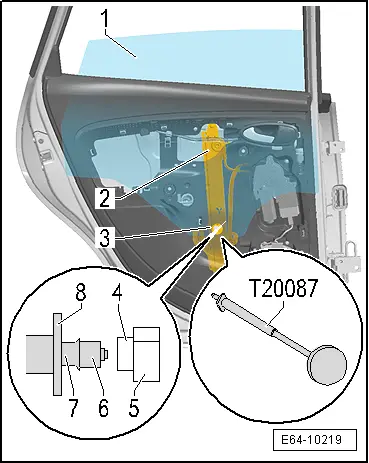
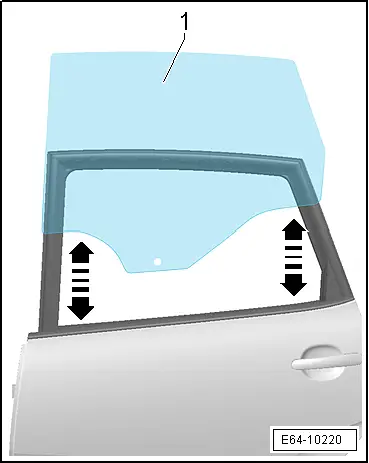
–  Raise or lower the door window -1- until you have access to the bolts -4- and to the expandable plug -5- of the window lifter recess.
–  Insert the pressing-on tool -T20087- in its minimum thread connecting position through the access borehole of the window lifter guide -2- on the subframe.
–  Turn the pressing-on tool -T20087- by 1/4 turn to secure the plugs -8- behind the window lifter guide -2-.
–  Centre the support -6- of the apparatus using the bolt -4-.
  Note
Take care to centre the pressing-on tool -T20087- accurately in the centre of the bolt -4- to prevent the window from breaking.
–  Start to fit the pressing-on tool -T20087- until the bolt -4- moves from its position.
–  If the bolt -4- is loose, unscrew it again to detach the expandable plug -5- from the mount using the support -7- of the pressing-on tool -T20087-.
–  Remove the pressing-on tool -T20087-.
  E64-10219
–  Remove the door glass -1- upwards.
Fitting .
Fit in reverse order from removal, remembering the following:
  E64-10220
–  Insert the expandable plug -2- and pin -1- in the window -3-.
–  Determine the overshoot of the expansion stopper on both glass sides.
–  Feed the window -3- into the door.
–  By slight jerk from above on the window -arrow-, engage the expandable plug in the window guide -4-.
Tightening torques → Chapter
  WARNING
Before mounting the door trims, the function of the components must be checked.
→ Chapter „Synchronisation and storage of window course“.
→ Chapter „Automatic raising or lowering: Commissioning“.
  E64-10221

Front door window > < Removing and installing screwed side window