
Leon Mk1
| Spoiler bracket: removal and installation |
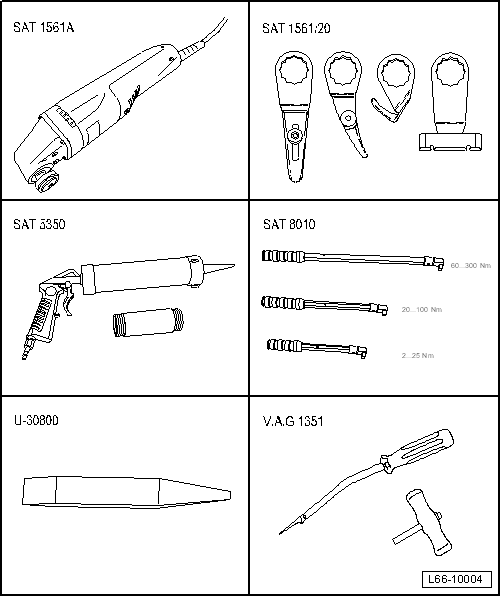
| Special tools and workshop equipment required |
| t | Electric cutter -SAT 1561A- |
| t | Knife set -SAT 1561/20- |
| t | Window sealant pistol -SAT 5350- |
| t | Torque wrench kit -SAT 8010- |
| t | Lever -U 30800- |
| t | Cutting tool -VAG 1351- |
|
|
|
|
|
|
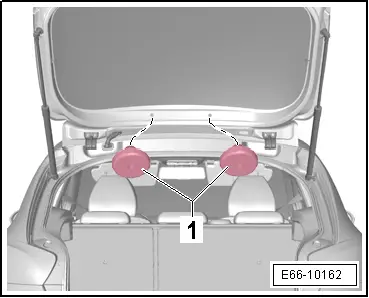
| – | Remove the spoiler → Chapter |
 Note
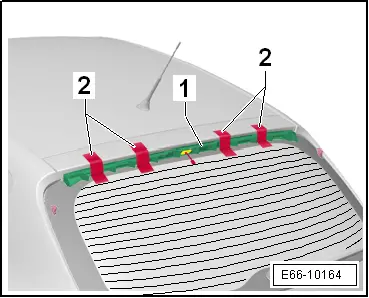
Note| t | For the purpose of protecting the sidewall, stick the masking tape -4- to the rear side panels as shown in the figure. |
| t | There are two openings between the rear lid and the spoiler mounting -5-, exactly at that position where the recess begins for the adhesive application -2-. |

| – | Using your hand, feed the cutting thread -1- in between the rear lid and the spoiler mount -5- in the direction of the -arrow- as shown in the figure. |
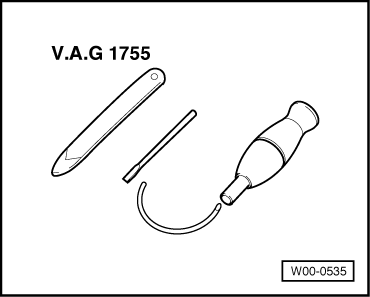
| – | Hold the end of the cutting thread -1- and guide it through the wiring guide -3- of the window removal set -VAG 1755-. |

| – | Push the wiring guide -4- of the window removal set -VAG 1755- across the bottom side of the mount -3- until the end. |
Note| The cutting thread -1- must be positioned accurately in front of the recess for the glue application -2- as shown in the figure. |
| – | Remove the wiring guide -4- of the window removal set -VAG 1755- and attach the wiring guide handle -VAG 1351/2- to the end of the cutting thread |
| – | Guide the cutting thread -1- across the top side of the mount and attach to the end of the cutting thread of the wiring guide handle -VAG 1351/2-. |
 WARNING
|
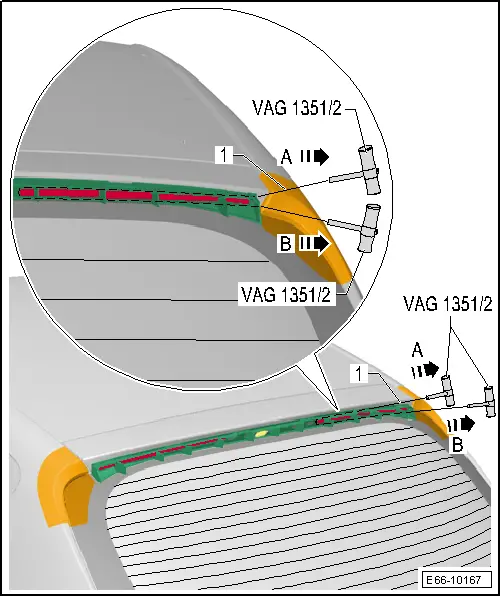
| – | Move it back and forth in the direction of -arrow A- and -arrow B-. |
| – | After one side of the mount has been release, loosen the other side using the same process. |
|
|
|
| – | Remove bolts -5-. |

| – | Insert an Allen key Ø6 -2- into the opening -4- of the rear lid and apply pressure to release the clips from the mount -1-. In doing so, move the Allen key in the direction of the -arrow-. |
| – | Remove the mount -3- from the rear lid. |
Note| To prevent the wire of the brake light from falling into the flap, fasten it with masking tape. |
|
Note| The surface of moving parts must be cleaned before applying the primer. |
| – | Only remove the glue residues using glue solvent -D 002 000 10- when the same mounts or the same rear window are used. |
| – | Moisten a cloth with cleaning solvent -D00940104-. |
| – | Carefully and thoroughly clean the area to be glued with the moistened cloth and allow to dry. |
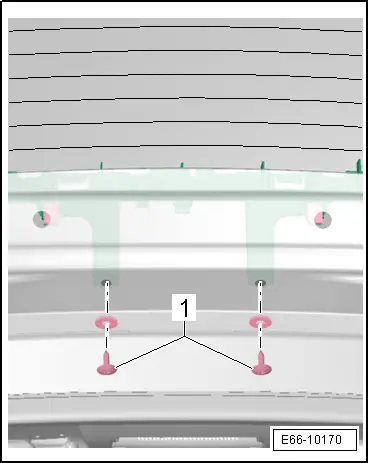
| – | When fitting the same mount, fix double sided adhesive tape -2- with a length of 255 mm to both sides of the mount -1- as shown in the figure. |

| – | Preparing the rear lid panel for fitting the spoiler mounts |
Note| If the panel of the rear lid is damaged when separating the adhesive cord for fitting the spoiler mount, the section of the paintwork must be repaired according to the instructions in the Repair Manual "Vehicle Paintwork". |
| Continue only for rear lid panels with remaining material |
| – | Cut back the remaining material on the rear flap to max. 1 to 2 mm using the electric knife -SAT 1561A- and the set of blades -SAT 1561/20-. |
Note| The remaining material on the rear flap is used as an adhesive basis for the new sealing glue to be applied. |
WARNING
|
 Caution
|
| – | Trim the gluing surface just before fitting. |
| – | Do not apply primer to the gluing surface, or treat with solvents. |
| Exception: if gluing is not accomplished immediately after cutting back, it is necessary to activate the remaining bid with the glass activator -D 181 801 A1-. |
WARNING
|
| Continue only for rear lid panels without remaining material |
| If no more remaining material is on the rear lid panel due to repair work or if the rear flap has been replaced, proceed as follows: |
| – | Apply the primer -D00920002- to the rear flap panel equally -6-. |
Note| The position of the primer coating on the rear flap -6- is determined from the recess for the adhesive cord -1-. |
| Drying time, dry for approx. 10 minutes. |
| Continue for all vehicles |
| – | Apply the adhesive cord of the single-component adhesive 110 ML -DH 009 100 03- in the recess -3- of the mount -1-. |
| – | Fix the mount -1- to the rear flap, where the single-component adhesive should not make contact with the rear flap. |
| – | Guide the cable -4- over the reinforcement -5- and remove through the support -7- of the mount -1-. |
| – | Remove the protective film from the double sided adhesive tape -2- and press the mount -1- onto the rear flap until you hear the clips engaging. |
WARNING
|
|
|
|
|
|
|