seat Workshop Repair Guides

SEAT Workshop Service and Repair Manuals

Removing and installing drive plate > < Renewing crankshaft oil seal -belt pulley end
4-cyl. injection engine (2 valve without intermediate shaft), Mechanics
Removing and installing sealing flange and pressure plate/drive plate
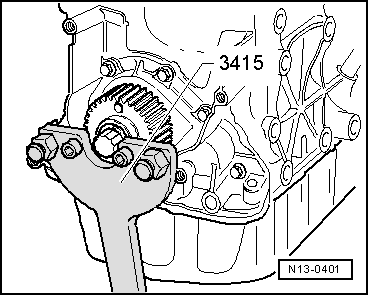
Removing and installing front sealing flange
 
W13-0101

Special tools, workshop equipment, test and measuring appliances and auxiliary items required

  • ◆ 3415 Counter-hold tool
  • ◆ T10053 Assembly device
  • ◆ V.A.G 1331 Torque wrench (5...50 Nm)
  • ◆ V.A.G 1332 Torque wrench (40...200 Nm)
  • ◆ Hand drilling machine with plastic brush insert
  • ◆ D176404 A2 Silicone sealant
  • ◆ Flat scraper

Removing

 
N13-0401
  • ‒ Remove ribbed belt .
  • ‒ Remove toothed belt => Page15-6.
  • ‒ → Remove crankshaft toothed belt sprocket. To do this counter-hold sprocket with 3415.
  • ‒ Drain engine oil.
  • ‒ Remove sump => Page 17-12.
  • ‒ Unbolt front sealing flange.
  • ‒ Take off sealing flange, release using light blows with a rubber headed hammer if necessary.
 
A17-0030
  • ‒ Remove sealant residue on cylinder block with a flat scraper.
  • ‒ Cover seal with a clean rag.
  • ‒ → Remove sealant remains on sealing flange with a rotating plastic brush (wear protective goggles).
  • ‒ Clean sealing surface, must be free of oil and grease.

Installing

Notes:

  • ◆ Note the use by date of the sealant.
  • ◆ The sealing flange must be installed within 5 minutes of applying the silicone sealant.
 
N17-0084
  • ‒ → Cut off tube nozzle at forward marking (nozzle approx. 3 mm ø).
  • ‒ Apply silicone sealing compound, as shown, to clean sealing surface of the sealing flange. Sealing compound bead must be:

Notes:

  • ◆ Thickness of sealing bead -arrows-: 2 ... 3 mm
  • ◆ The sealing bead must not be thicker, otherwise excessive sealant may drip into the oil sump, the intake pipe oil strainer may be blocked and it could also drip onto the sealing surface of crankshaft seal.
  • ◆ Cover the sealing surface of the oil seal with a clean cloth before applying the sealant.
  • ‒ Fit sealing flange immediately and lightly tighten all bolts.

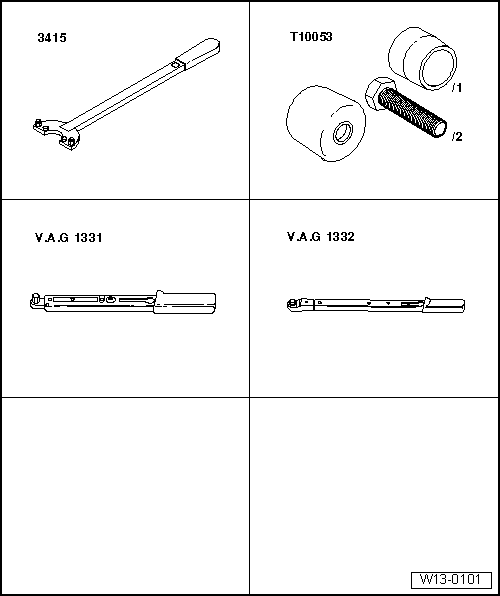
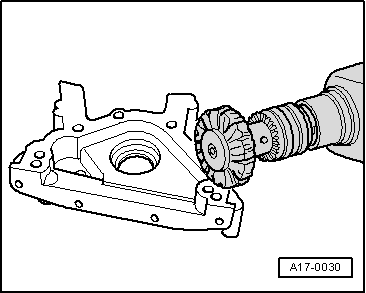
Note:

Use guide sleeve T10053/1 to fit sealing flange with the oil seal already installed.

  • ‒ Tighten sealing flange securing bolts using alternate sequence.
        Tightening torque:15 Nm
  • ‒ Remove excess sealant
  • ‒ Install sump => Page 17-12.

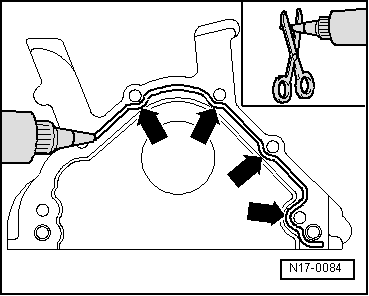
Note:

After installing, the sealant must be allowed to dry for approx. 30 minutes before engine oil is replenished.

 
N13-0401
  • ‒ → Install crankshaft toothed belt sprocket and hold with counter-hold tool 3415.
  • ‒ Tighten central bolt to 60 Nm and turn
        90° (1/4 turn)
    further (turning further can be done in several stages).

Note:

Thread and shoulder must be free of oil and grease.

Installing toothed belt and adjusting valve timing => Page 15-6.

  • ‒ Install ribbed belt => Page 13-11.

Removing and installing drive plate > < Renewing crankshaft oil seal -belt pulley end