
Leon Mk1
 Note
Note
|
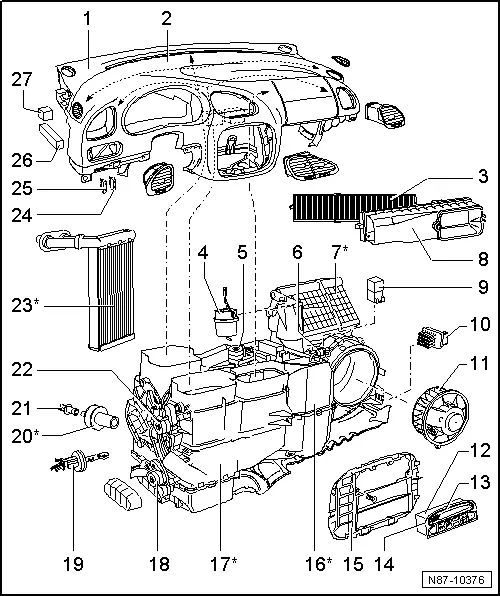
| 1 - | Dash panel |
| q | Removing and installing → Rep. Gr.70 |
| q | Removing and installing air ducts and vents → Chapter; Repairing heating |
| 2 - | Sunlight penetration photosensor -G107- |
| q | Tasks: controls temperature flap and fresh air blower depending on light intensity |
| q | Emergency running in event of failure: Climatronic control unit -J255- assumes fixed value |
| q | Checking: read and clear fault memory via self-diagnosis → Chapter |
| q | Lever out using a screwdriver with a pad underneath |
| 3 - | Dust and pollen filter |
| q | Removing and installing → Chapter |
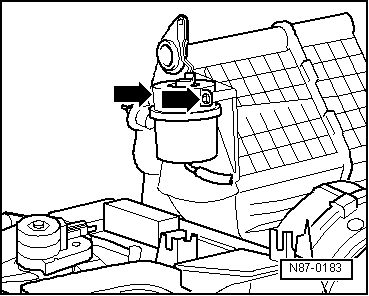
| 4 - | Vacuum unit for fresh air and air recirculation flap |
| q | Ventilated: fresh air operation |
| q | Vacuum hose connection diagram → Chapter |
| q | Removing and installing → Fig. |
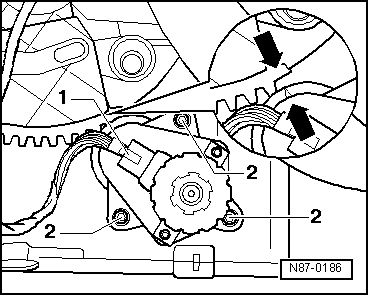
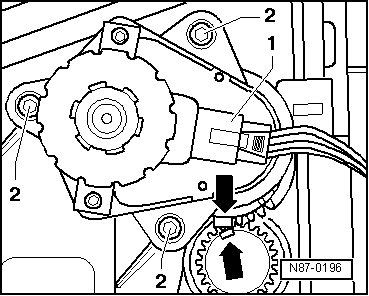
| 5 - | Temperature flap control motor -V68- |
| q | Checking: read and clear fault memory via self-diagnosis → Chapter |
| q | Removing and installing → Fig. |
| 6 - | Two-way valve for fresh air and air recirculation flap -N63- |
| q | Checking: read and clear fault memory via self-diagnosis → Chapter |
| q | Removing → Fig. |
| 7 - | Air intake duct* |
| q | With fresh air and air recirculation flap |
| 8 - | Filter housing |
| q | Replacing → Chapter. |
| q | Removing and installing → Chapter |
| 9 - | Blower relay -J323- |
| q | For fresh air blower and blower for 2nd evaporator |
| q | Behind dash panel on right |
| q | Control number 114 |
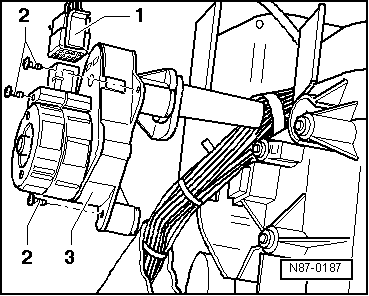
| 10 - | Fresh air blower control unit -J126- |
| q | Task: continuously variable control of fresh air blower speed depending on voltage |
| q | Checking: read and clear fault memory via self-diagnosis → Chapter |
| q | Replacing → Fig.. |
| 11 - | Fresh air blower -V2- |
| q | To renew: remove stowage compartment on the front passenger side → Rep. Gr.68. |
| 12 - | Climatronic control unit -J255- |
| q | The Climatronic control unit -J255-, the operating and display unit for Climatronic air conditioning system -E87- and the dash panel temperature sensor -G56- with temperature sensor blower -V42- are combined in one unit which cannot be dismantled. |
| q | Checking: read and clear fault memory via self-diagnosis → Chapter |
| q | Removing and installing → Chapter |
| q | Do not dismantle further |
| q | After installing a new control unit, check the control unit code → Chapter |
| 13 - | Operating and display unit for Climatronic air conditioning system -E87- with Climatronic control unit -J255- |
| q | Do not dismantle further |
| q | Checking: → Chapter, final control diagnosis |
| q | Removing and installing → Chapter |
| 14 - | Dash panel temperature sensor -G56- with temperature sensor blower -V42- |
| q | Integrated in Climatronic control unit -J255- |
| q | Function: temperature sensor controls temperature flap and fresh air blower, depending on temperature |
| q | Emergency running in event of failure of dash panel temperature sensor -G56-: continued operation assuming value of +24 °C |
| q | Checking: read and clear fault memory via self-diagnosis → Chapter |
| 15 - | Centre section of instrument panel |
| 16 - | Evaporator housing* |
| q | With evaporator |
| q | Do not dismantle further |
| 17 - | Heater and air conditioning unit for front seats* |
| q | With evaporator |
| q | With air distribution flap |
| q | With footwell/defroster flap |
| q | With temperature flap |
| q | Removing and installing → Chapter |
| q | Dismantling and assembling → Chapter |
| 18 - | Front air distribution control motor -V145- |
| q | Checking: read and clear fault memory via self-diagnosis → Chapter |
| q | Removing and installing → Fig. |
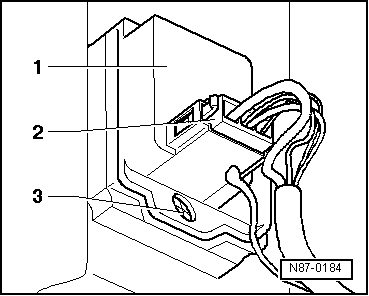
| 19 - | Front vent temperature sender -G152- |
| q | Emergency running in event of failure of front vent temperature sender -G152-: continued operation assuming value of +42 °C. |
| q | Checking: read and clear fault memory via self-diagnosis → Chapter |
| q | Removing → Fig. |
| 20 - | Water drain pipe* |
| q | Checking → Fig. |
| 21 - | Lip valve |
| 22 - | Centre vent control motor -V102- |
| q | Checking: read and clear fault memory via self-diagnosis → Chapter |
| q | Removing → Fig. |
| 23 - | Heat exchanger* |
| q | Seals must be bonded free of gaps all around |
| q | If tabs do not engage when inserted or if they have broken off, bolt on heat exchanger. |
| q | After removal, completely renew coolant. |
| 24 - | Front Climatronic fuse -S140- |
| q | Above relay plate |
| 25 - | Rear Climatronic fuse -S141- |
| q | Above relay plate |
| 26 - | Magnetic clutch relay -J44- |
| q | On relay carrier |
| q | Only on vehicles with engine code AAA |
| q | Control number 186 |
| q | Checking: read and clear fault memory via self-diagnosis → Chapter |
| 27 - | Radiator fan control unit -J293- |
| q | In engine compartment, front left → Current flow diagrams, Electrical fault finding and Fitting locations |
| q | Observe Part No. |
| q | Installed to model year 1998, not on vehicles with engine code AAA |
|
|
|
|
|

|
|
|
|
|
|
|
|

|