seat Workshop Repair Guides

SEAT Workshop Service and Repair Manuals

Removing and installing expansion valve > < System overview - refrigerant circuit
Removing and installing high-pressure sender
Special tools and workshop equipment required
   
t  Torque wrench -V.A.G 1331-
  W00-0427
t  Tool insert (17 mm) -V.A.G 1331/6-
Removal:
  W00-1126
–  Unplug connector -2-.
  Note
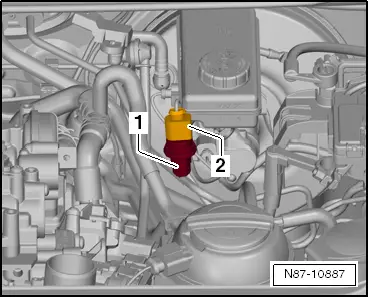
If refrigerant escapes from the refrigerant line for longer than 1 second when undoing the High pressure sender -G65-, the High pressure sender -G65- must be tightened again and the refrigerant extracted. The check valve of the refrigerant line is defective and must be replaced.
–  Unbolt high-pressure sender -G65--1-.
Installation
  Note
t  Renew O-ring.
  N87-10887
t  Bolt on high-pressure sender -G65--1- (8 ± 1 Nm).
–  Plug in connector -2-.
  N87-10887

Removing and installing expansion valve > < System overview - refrigerant circuit