seat Workshop Repair Guides

SEAT Workshop Service and Repair Manuals

Differential: adjustment > < Differential: Dismantling and assembling
Differential crown: removing and installing
   
Differential crown: removing and installing
Special tools and workshop equipment required
t  Electric blower -SAT 1416-
t  Digital thermometer -SAT 4002-
t  Gearbox repair set -U-40200-

Removing
  Note!
t  Protect the roller bearings from damage and metal filings
t  Before and after drilling the rivets, thoroughly clean the differential casing
   
–  Drill the rivet heads from the bevelled side, with a Ø 12 mm drill bit.
–  Remove the rivets from their holes with a drift.
–  Heat the differential crown with the -SAT 1416- electric lower to 120 °C. Check the temperature with a digital thermometer -SAT 4002-.
  V39-1282
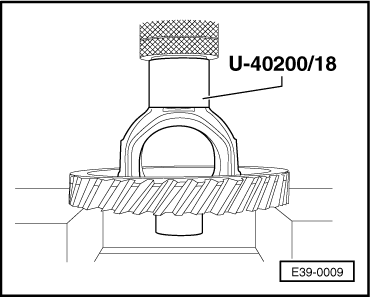
–  Place the differential casing in a press and seaparate the crown from the case. Use tool -U-40200/18-, locating the bevelled side facing the differential casing.
Installation
Before fitting the differential crown, consult the section Code letters, assignement of groups, ratios, filling amounts → Chapter
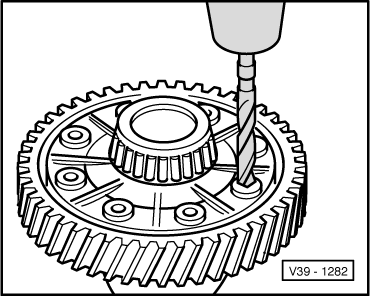
–  Clean the contact surfaces of the crown wheel and differential casing thoroughly. Use a wire brush and a scraper. Do not use emery cloth or sandpaper. The contact surfaces must be totally clean and freee from oil and grease.
  Note!
t  To fit the crown correctly onto the differential casing work rapidly without interruptions fitting it to the limit
t  If both components lock or jam on fitting, stop the assembly process
Assembly position:
  E39-0009
Groove -A- must be facing the part of the differential casing that is bolted.
–  Heat the differential crown with the -SAT 1416- electric lower to120 °C. Check the temperature with a digital thermometer -SAT 4002-.
  N39-0556
–  Fit the differential crown onto the differential casing in the correct assembly position . Use bolts -A- from the repair kit to guide the crown during assembly on the differential casing.
–  Bolt both elements with the bolts from the repair set and tighten to 65 Nm torque. → Parts Catalogue.
  V39-0646

Differential: adjustment > < Differential: Dismantling and assembling