
Leon Mk1
 Note
Note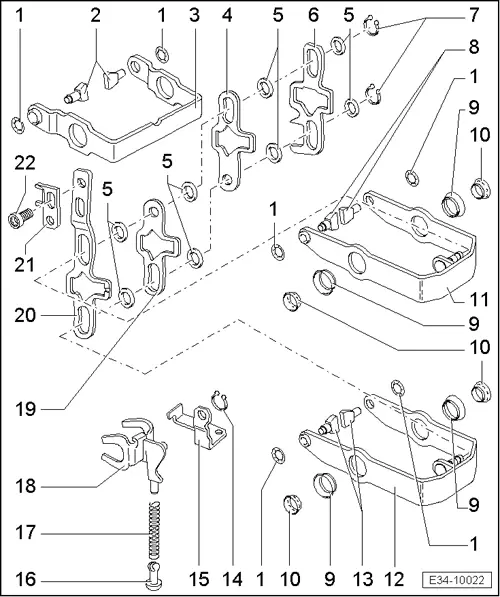
| 1 - | Retainer |
| q | Removing → Fig. |
| q | Fitting → Fig. |
| q | Always replace. |
| 2 - | Gearbox selector bolt |
| q | Identification → Fig. |
| q | After installing the spring washer, the commutation bolts must be able to move slightly |
| 3 - | Fork for 5th gear |
| q | Adjust convergence → Fig. |
| 4 - | Connection guide for 1st/2nd gear |
| 5 - | Dished washer |
| 6 - | Connection guide for reverse gear |
| 7 - | Circlip |
| 8 - | Gearbox selector bolt |
| q | Identification → Fig. |
| q | After installing the spring washer, the commutation bolts must be able to move slightly |
| 9 - | Inner ring of ball bearing |
| q | Removing → Fig. |
| q | Pressing in → Fig. |
| 10 - | Ball bearing |
| 11 - | Fork for 3rd/4th gear |
| q | With gearbox commutation bolt → Fig. |
| 12 - | Fork for 1st/2nd gear |
| q | With gearbox commutation bolt → Fig. |
| 13 - | Gearbox selector bolt |
| q | Identification → Fig. |
| q | After installing the spring washer, the commutation bolts must be able to move slightly |
| 14 - | Circlip |
| 15 - | Reverse gear prong support |
| 16 - | Sliding piece |
| 17 - | Spring |
| 18 - | Reverse gear prong |
| 19 - | Connection guide of 3rd/4th gear |
| 20 - | Switching track for 5th gear |
| 21 - | Connection opening for 5th gear |
| 22 - | Bolt, 25 Nm |