SEAT Workshop Service and Repair Manuals
HOME
FEATURES
MENU
INDEX
ABOUT US
Removing and installing fuel tank >
< Removing and installingf fuel supply system parts
Leon Mk1
Power unit
1,9 l SDi engine, mechanics
Fuel supply, gas operation / Removing and installingf fuel supply system parts
Removing and installing fuel tank
Removal
Removal
–
Observe safety precautions before beginning installation work
→ Chapter
–
With ignition switched off, disconnect battery earth strap.
Commercial vehicles
–
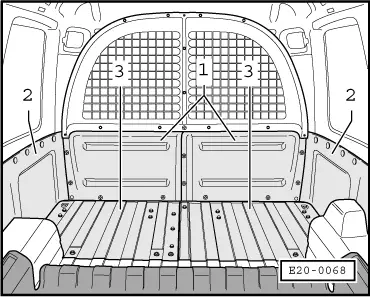
Partially separate the front part of the lining carpet in the loading area.
–
Extract the lower panels
-1-
from the dividing wall.
–
Remove the forward linings
-2-
.
–
Extract underbody protection plates
-3-
, and separate the reinforcing cross member.
Kombi vehicles
–
Rock the rear seat forward.
–
Fold rear seat forwards.
Continued for all vehicles
–
Remove the fuel gauge sender cover
–
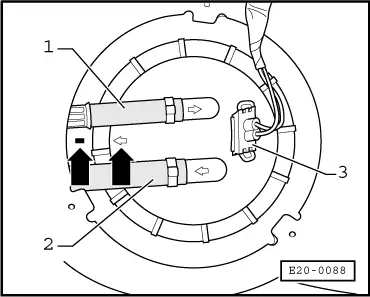
Extract the flexible supply hose
-1-
(black), and return hose
-2-
(blue), and the connector
-3-
.
–
Empty the fuel tank.
–
Remove the connecting piece
-1-
.
–
Remove all rear exhaust system brackets
-2-
from the bodywork.
–
Lower the exhaust system a little and secure it to the bodywork with wire.
–
Remove right rear wheel.
–
Detach filler pipe from body.
–
Remove the fuel tank filler neck and separate the neck from the bowl.
–
Secure the fuel tank with the hydraulic column jack -SAT 1040-.
–
Remove the fuel tank securing bolts, push aside the column jack and remove the tank together with the heat shield.
Note!
It is necessary to turn the tank 90° so that the filler neck passes through the space between the damper and the leaf spring.
Power unit
1,9 l SDi engine, mechanics
Fuel supply, gas operation / Removing and installingf fuel supply system parts
Removing and installing fuel tank
Removing and installing fuel tank >
< Removing and installingf fuel supply system parts
 Note!
Note!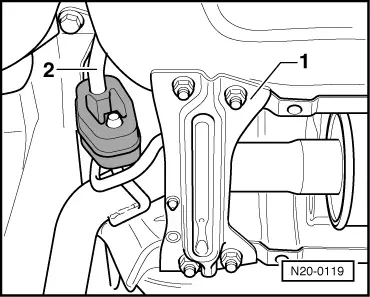
 Note!
Note!