seat Workshop Repair Guides

SEAT Workshop Service and Repair Manuals

Ignition system, glow plug system > < Exhaust gas recirculation system
Exhaust gas temperature sender 2G448: Removing and installing
Exhaust gas temperature sender 2 -G448-: Removing and installing
t  Removing → Anchor
t  Installing → Anchor
t  Tightening torques → Anchor
Consult the equivalence table for tools and equipment according to applicability among Seat / VW / Audi / Skoda → Chapter.
   
Special tools and workshop equipment required
t  Torque wrench kit -SAT 8010-, see equivalent → Anchor
t  Socket wrench 17 mm -T20211-, see equivalent → Anchor
t  Ratchet 1/2' x 9-12 -VAG 1331/1-, see equivalent → Anchor

Removing
   
–  Detach the outer -1- and inner -2- engine covers, by pulling them evenly upwards.
  E01-10018
–  Disconnect the electric connector -2- for the exhaust gas temperature sender 2 -G448- and set cable to one side.
  E26-10032
–  Separate the clamps -arrows- and remove the supercharger hose -1-.
  E21-10036
–  Detach electrical connector -1- of the engine intake manifold flap -V157-.
–  Unscrew the bolts -arrows- and remove the intake manifold flap motor -V157-.
  A10-10029
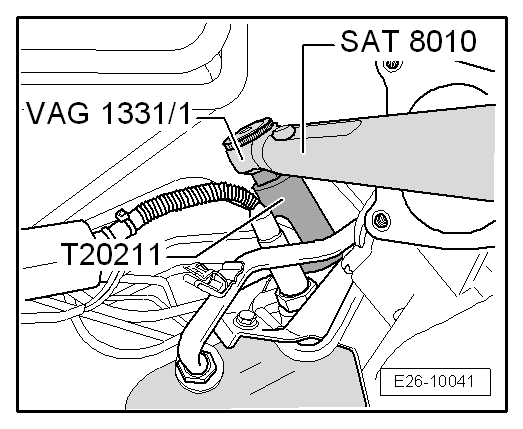
–  Undo the exhaust gas temperature sender 2, bench 1 -G448--2- using the socket wrench E/C 17 -T20211- and the "ratchet 1/2" x 9-12" -VAG 1331/1-.
Installing
Continue the installation in the reverse order of removal sequence, observing the following:
t  The thread on the new senders is coated with a special paste; the paste must not get into the slots on the probe body
t  When reusing the old sender, lubricate the thread with high-temperature lubricant; the paste must not get into the slots on the probe body; high-temperature lubricant → Parts catalogue.
t  When assembling, the sender cable must be fixed in its original position to avoid contact with the exhaust pipe.
Tightening torques
  E26-10041
Components:Nm
Exhaust gas temperature sender 2 -G448- on the particle filter:45


Ignition system, glow plug system > < Exhaust gas recirculation system