seat Workshop Repair Guides

SEAT Workshop Service and Repair Manuals

Exhaust gas pressure sensor 1G450: Removing and installing > < Intake manifold flap: Assembly overview
Intake manifold: removing and installing
Consult the equivalence table for tools and equipment according to applicability among Seat / VW / Audi / Skoda → Chapter.
   
Special tools and workshop equipment required
t  Torque wrench kit -SAT 8010-, see equivalent → Anchor
t  Base -T20174-, see equivalent → Anchor
t  Socket wrench 22 mm -T20202A-, see equivalent → Anchor
t  Socket wrench 17 mm -T20211-, see equivalent → Anchor
t  Articulated wrench e/c 17 -T20212-, see equivalent → Anchor
t  Ratchet 1/2' x 9-12 -VAG 1331/1-, see equivalent → Anchor

t  Removing → Anchor
t  Installing → Anchor
   
Removing
–  Release the fasteners -arrows- to remove the central soundproofing panel.
  E10-0086
–  Unscrew the bolts -arrows- and remove the heat protecting plate.
–  Remove right-hand articulated shaft → Running gear; Rep. gr.40
  A10-0921
–  Unbolt the pressure pipe -2- using the articulated wrench E/C 17 -T20212-.
–  Unbolt the temperature sender after the particulate filter -G527--1- using the articulated wrench E/C 17 -T20212-.
  E26-10042
–  Detach the outer -1- and inner -2- engine covers, by pulling them evenly upwards.
  E01-10018
–  Separate the clamps -arrows- and remove the supercharger hose -1-.
  E21-10036
–  Detach electrical connector -1- of the engine intake manifold flap -V157-.
–  Unscrew the bolts -arrows- and remove the intake manifold flap motor -V157-.
  Note
For improved understanding, it is shown from the rear in the illustration with engine removed.
  A10-10029
–  Disconnect the electrical connector -1- on the exhaust gas recirculation valve -N18- with the potentiometer for regulating exhaust gases -G212-.
–  Remove the electrical harness from the brackets and move to one side.
–  Remove bolts -arrows-.
–  Remove the exhaust gas recirculation valve -N18- of the intake manifold.
  A10-10030
–  Disconnect the connectors -1-, -2-, -3- and -4- and remove them from their housings.
  E26-10032
–  Undo the pressure pipe -3- of the particulate filter using the socket wrench E/C 17 -T20211-.
–  Undo the lambda probe -G39--1- using the socket wrench E/C 22 -T20202A- and the "ratchet 1/2" x 9-12" -VAG 1331/1-.
–  Unscrew the bolts -arrows- and free heatproof plate of the particulate filter -4- without removing it.
  E21-10027
–  Undo the exhaust gas temperature sender 2, bench 1 -G448--2- using the socket wrench E/C 17 -T20211- and the "ratchet 1/2" x 9-12" -VAG 1331/1-.
  E26-10041
–  Disconnect the electrical connector -arrow- for temperature sender 1 of the exhaust gases -G450-.
–  Undo the nuts -1- and remove the exhaust gas pressure sensor 1 -G450- together with the pressure pipes.
–  Remove the heatproof plate of the particulate filter.
  E10-10057
–  Unscrew the brackets -5- of the particle filter.
  E21-10027
–  Unscrew the nuts on the double clamp -1-. In that case it is not necessary to unscrew nuts -arrows-.
  Note
The flexible pipe connection (de-coupling element) in the front exhaust pipe must not be bent more than 10° - otherwise it can be damaged.
  A26-0734
–  Remove the support bolts of the particle filter and the engine block, and remove the support.
–  Remove the front part of the exhaust pipe with the particulate filter and place it on the power steering.
–  Separate the low pressure hoses if necessary.
  A26-10190
–  Remove the bolts -arrows- which are in the flange found between the exhaust gas recirculation radiator and the intake manifold.
  A23-10004
–  Remove the air filter intake hose -3-.
–  Detach connection hose -2-.
  E26-10033
–  Unscrew the nuts -arrows- and take connecting pipe for exhaust gas recirculation off.
  A26-10191
–  Remove the bolts -1-, -2- and the hollow bolt -3- and remove the oil return pipe.
  A21-10088
–  Remove the thermal protection plate on the left of the exhaust manifold -arrows-.
–  Remove air filter → Chapter.
  A26-10201
–  Undo the fastening bolts of the turbocharger and of the bracket -arrows-.
  A21-0306
–  Remove nuts -arrows-.
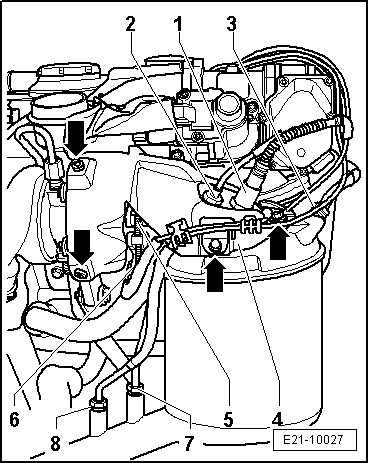
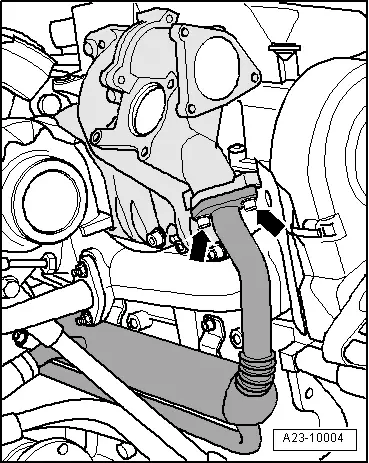
–  Remove the exhaust manifold assembly/turbocharger and place it on the power steering.
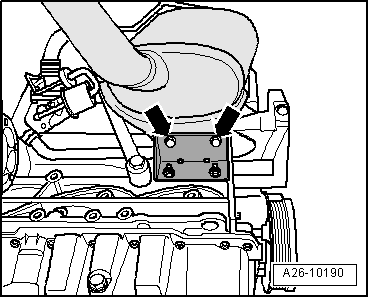
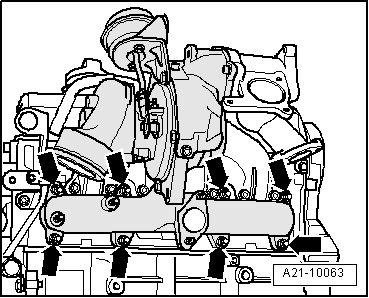
–  Remove the six bolts which secure the intake manifold to the cylinder head and remove it from the top.
Installing
Continue the installation in the reverse order of removal sequence, observing the following:
  Note
t  Apply the correct tightening torques.
t  Renew seals, gaskets and self-locking nuts.
t  Note the installation position of intake manifold gasket.
t  
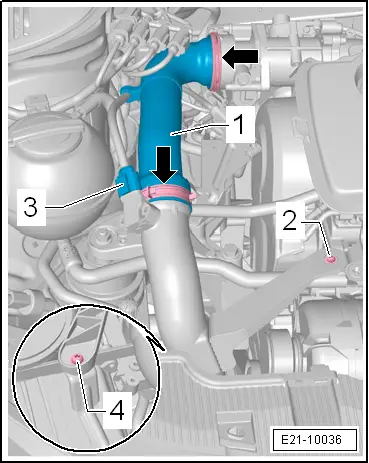
The sleeves for the hoses and the supercharger air flow tubes should be free of oil and grease before fitting → Chapter
t  Secure all hose connections with the correct hose clips (same as original equipment) → Parts catalogue.
  A21-10063

Exhaust gas pressure sensor 1G450: Removing and installing > < Intake manifold flap: Assembly overview