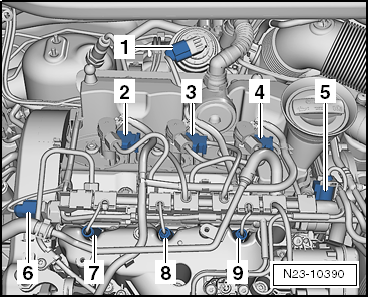
| Fuel pressure regulating valve -N276--5- is located on rail element (high-pressure accumulator). |

Note | The fuel pressure regulating valve -N276- cannot be re-used. |
| »Carry out the following work sequence« |
| The high-pressure accumulator must be removed later. |
| –
| Before removing the high-pressure accumulator, first clean it (e.g., with commercial cleaning solution). |
| –
| The area on the thread around the fuel pressure regulating valve -N276- must also be thoroughly cleaned. |
| l
| Under no circumstances may dirt enter the borehole of the fuel distributor. |
| l
| It must be ensured that no cleaning agent gets into the connector housing of the fuel pressure control valve -N276-. |
| l
| Collect escaping fuel with a cleaning cloth. |
Note | Seal off open connections immediately using a suitable plug to prevent dirt from entering. |
| –
| Remove rail element (high-pressure accumulator) → Chapter. |
| –
| Dry fuel pressure regulating valve -N276-. |
| –
| For loosening, counterhold the union nut on the hexagon flats on housing. Then unscrew and remove by hand. |
| –
| Extract dirt from threads and sealing surfaces. Do not use metal tools, etc. |
Note | t
| The fuel pressure regulating valve -N276- has a deformable sealing lip and no separate seal; it can therefore be used only once. |
| t
| Make sure that sealing surfaces (deformable sealing lip) and threads on new fuel pressure regulating valve -N276- are undamaged. |
| t
| Check sealing surface hole. |
| t
| The beginning of the thread and the deformable sealing lip of the fuel pressure regulating valve -N276- must be lubricated with Molykote grease. |
| –
| Align fuel pressure regulating valve -N276- so that connecting wire is free of tension after electrical connector is attached. |
| –
| Hold with socket spanner and tighten the screw connection. |
| t
| Tightening torque: Rail (High-pressure accumulator): Assembly overview → Chapter |
| –
| Install rail element (high-pressure accumulator) → Chapter. |
| –
| After installing, leave engine running at moderate speed for a few minutes and then switch off again. |
| –
| Check fuel system for leaks . |
Note | If the fuel pressure regulating valve -N276- or the high-pressure pump has been exchanged, it is essential that the learnt values for the regulating valve be reset using the vehicle diagnosis tester. Guided Functions; Reset the learn values of the control valve for fuel pressure. |
| –
| Then road-test the vehicle. Accelerate with full throttle at least once, then check the high-pressure section again for leaks. |
| –
| Read fault memory again. |
|
|
|
