Leon Mk1
| Removing and installing coolant pump and compact bracket |

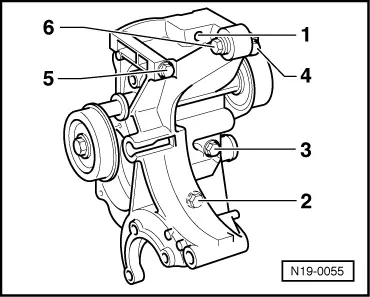
| 1 - | 25 Nm |
| q | Use counter-hold -T20018- to loosen and tighten |
| 2 - | Belt pulley |
| q | For coolant pump |
| 3 - | 10 Nm |
| 4 - | Coolant pump |
| q | Check for ease of movement |
| 5 - | O-ring |
| q | Renew |
| 6 - | 25 Nm |
| q | Do not tighten until the injection pump is bolted tightly to the console |
| q | Note tightening sequence → Fig. |
| 7 - | Compact bracket |
| q | For coolant pump, coolant thermostat, ribbed belt tensioning roller, alternator and P.A.S. vane pump |
| 8 - | 25 Nm |
| q | Note tightening sequence → Fig. |
| 9 - | Coolant thermostat |
| q | Checking: heat-up thermostat in water |
| q | Opening commences approx. 85 °C |
| q | Ends approx. 105 °C |
| q | Opening lift min. 7 mm |
| 10 - | Connection |