
Leon Mk1
| Removing and installing parts of the lubrication system |
 Note!
Note!| ¡The oil level must not be above the max. mark - danger of damaging catalyst! Marks → Fig. |
| Checking oil pressure → Chapter. |
| Oil system capacity: |
| with oil filter 3.2 ltr. |
| Engine oil specifications: |
| Use engine oil to VW standard 500 00, 501 01 or 502 00. Only in exceptional cases: Multi-grade oils corresponding to API-SF or SG. |
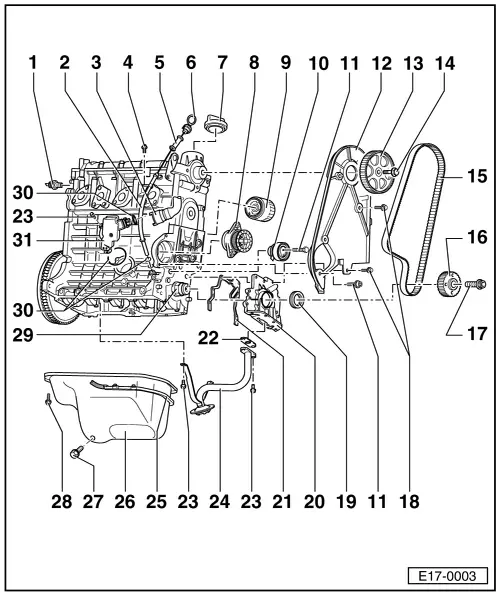
| 1 - | 0.3...0.6 bar oil pressure switch -F1-, 25 Nm |
| q | Identification: green |
| q | Checking → Chapter |
| q | If sealing ring is leaking nip open and replace |
| 2 - | Guide tube |
| q | Notes on installing → Anchor |
| 3 - | To air cleaner |
| 4 - | Bolt with cutting thread, 6 Nm |
| q | Notes on installing → Anchor |
| 5 - | Guide |
| q | Pull off to extract oil |
| 6 - | Dipstick |
| q | The oil level must not be above the max. mark! |
| q | Markings → Fig. |
| 7 - | Sealing cap |
| q | Renew seal if damaged |
| 8 - | Coolant pump |
| q | With integrated seal |
| q | Seal must not be separated from coolant pump |
| q | Replace damaged or leaking coolant pump together with seal |
| q | Check for ease of movement |
| 9 - | Oil filter |
| q | Loosen on hexagonal bolt |
| q | Tighten by hand |
| q | Observe installation instructions on oil filter |
| 10 - | Tensioner |
| q | Checking → Chapter |
| q | Tensioning toothed belts → Chapter |
| 11 - | 20 Nm |
| 12 - | Rear toothed belt guard |
| 13 - | Camshaft sprocket |
| q | Note position when installing the toothed belt → Chapter |
| 14 - | 20 Nm + 1/4 turn (90 °) further |
| q | To untighten and tighten, block the camshaft into place with the pulley wrench -T20018A- |
| q | Renew |
| 15 - | Toothed belt |
| q | Mark D.O.R. before removing |
| q | Check for wear |
| q | Do not kink |
| q | Removing, installing and tensioning → Chapter |
| 16 - | Crankshaft toothed belt sprocket |
| q | Note position when installing the toothed belt → Chapter |
| 17 - | 90 Nm + 1/4 turn (90 °) further |
| q | Renew |
| q | Oil threads |
| q | To untighten and tighten, block the wheel of the ribbed belt-crankshaft into place with the pulley wrench -T20018A- |
| q | The turning further can be done in several stages |
| q | The turning further angle can be measured with protractor -T20030- |
| 18 - | 12 Nm |
| q | Renew |
| 19 - | Oil seal |
| q | Renewing → Chapter |
| 20 - | Oil pump |
| q | Only renew complete |
| q | When installing note follower on crankshaft → Item |
| q | Must be located on dowel pins |
| q | Removing and installing → Chapter |
| 21 - | Gasket |
| q | Renew |
| q | Must seat on dowel pins |
| 22 - | Gasket |
| q | Renew |
| 23 - | 10 Nm |
| 24 - | Suction pipe |
| q | Clean strainer if soiled |
| 25 - | Cable guide |
| 26 - | Sump |
| q | Dismount and assemble → Chapter |
| q | Clean sealing surface before installing |
| q | Install with silicone sealant -D 176 404 A2- → Chapter |
| 27 - | Oil drain plug, 30 Nm |
| q | With attached seal |
| q | Renew |
| 28 - | 15 Nm |
| q | Loosen and then tighten the bolts on the wheel side using the Allen key -U-40051- |
| 29 - | Follower |
| q | Coat with oil before installing oil pump |
| 30 - | O ring |
| q | Renew |
| 31 - | Oil separator |
|