| –
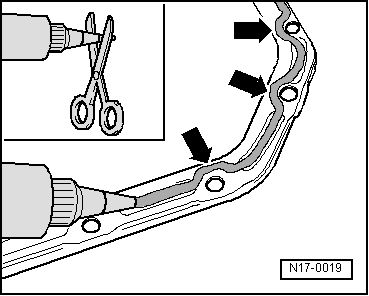
| Apply silicone based sealant to the clean contact surface of the oil sump, in the way indicated in the fig. (The fig. shows the position of the sealing bead in the engine block). |
| –
| Immediately fit the oil sump and tighten the fastening bolts, as indicated as follows: |
| 1 - | Lightly tighten the oil sump/engine block bolts in a cross pattern. |
| 2 - | Lightly tighten the oil sump/gearbox bolts. |
| 3 - | Tighten all the oil sump/engine block bolts in a cross pattern. |
| 4 - | Tighten the oil sump/gearbox bolts to 25 Nm. |
| 5 - | Tighten the oil sump/engine block bolts to 15 Nm with a cross pattern. |

Note! | t
| After installing the oil sump, the sealant should dry for approx. 30 minutes. After that time, the oil can be added. |
| t
| When installing the oil sump in the disassembled engine, ensure that the sump is flush with the engine block on the engine flywheel side. |
| Continue to install in the opposite order of removal. |
|
|

|