
Leon Mk1
|
 Caution
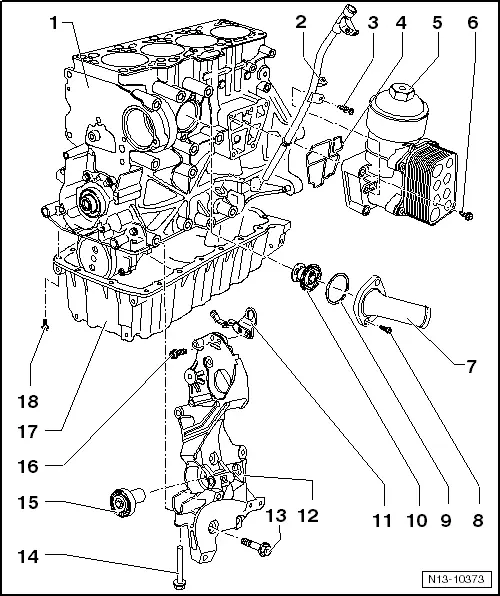
| 1 - | cylinder block |
| q | Removing and installing sealing flange and flywheel → Chapter. |
| q | Removing and installing crankshaft → Chapter. |
| q | Assembly overview - pistons and conrods → Chapter |
| 2 - | Guide pipe |
| q | Renew O-ring. |
| 3 - | Clip |
| 4 - | gaskets |
| q | Replace |
| 5 - | Oil filter bracket |
| q | Assembly overview → Chapter |
| 6 - | 14 Nm and then turn 180° further |
| q | Replace |
| q | First fit the bolts at the top left and bottom right, then tighten all four bolts crosswise |
| 7 - | Joint mouth |
| q | For thermostat |
| 8 - | 13 Nm |
| 9 - | O ring |
| q | Replace |
| 10 - | Coolant thermostat: |
| q | Observe installation position, Removing and installing thermostat → Chapter. |
| q | Check: heat the thermostat in water |
| q | Starts opening at approx. 85 ℃ |
| q | Ends at approx. 105 ℃. |
| q | Opening lift at least 7 mm. |
| 11 - | Attachment rings |
| 12 - | Spring retainer |
| q | For ancillaries |
| 13 - | Bolt. |
| Tightening torque / turning further angle → Chapter |
| 14 - | 30 Nm + 90° |
| q | Replace |
| l | Tightening sequence of the idler roller screw: → Anchor |
| 15 - | Idler roller with bolts |
| 16 - | 25 Nm |
| 17 - | Oil pan |
| q | Clean sealing surface before installing |
| q | Install with silicone sealant -D 176 404 A2-. |
| 18 - | 15 Nm |