seat Workshop Repair Guides

SEAT Workshop Service and Repair Manuals

Fuel tank with accessory parts: Removing and installing > < Fuel tank with accessory parts: Assembly overview
Fuel tank: draining
Fuel tank: draining
Consult the equivalence table for tools and equipment according to applicability among Seat / VW / Audi / Skoda → Chapter.
Special tools and workshop equipment required
   
t  Fuel drainage equipment -VAS 5190-, see equivalent → Anchor
Operation process
Observe safety precautions → Chapter.
Observe rules for cleanliness → Chapter.
  Caution
When disconnecting battery, observe safety measures → Electrical system; Rep. gr.27.
  W00-1107
–  With ignition switched off, disconnect earth wire -arrow- at battery.
  Caution
Connect the earth line of the fuel suction unit -VAS 5190- to a bright point on the body.
  E27-10033
–  Remove the taper piece -2- from the shank -1- of the fuel suction unit -VAS 5190-.
–  Use insulating tape to mark the extraction hose -arrow- at a distance of -a- = 1.465 mm from the end of the hose.
  A20-0703
–  Remove the filling cap from the fuel filler neck.
–  Screw the shank -1- of the fuel suction unit -VAS 5190- on to the filling neck of the fuel tank.
–  Insert the suction hose up until the mark made previously -arrow- is at the level of the rod.
  Note
  A20-0702
t  If a suction unit without shank is being used, the procedure is the same in principle.
t  
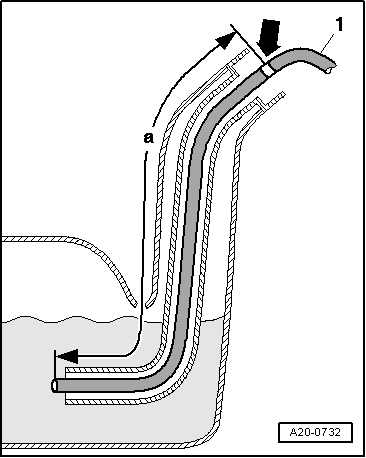
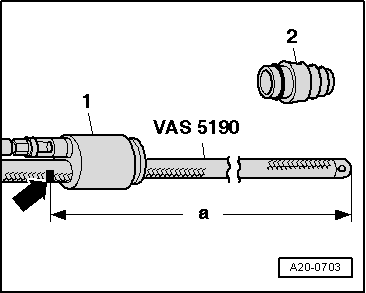
In this case, use insulating tape to mark the extraction hose -arrow- at a distance of -a- = 1.400 mm from the end of the hose. The extraction hose has been properly inserted when the affixed mark is level with the edge of the filler neck.
t  If hose is difficult to insert, apply a thin coat of engine oil. DO NOT use silicone-based lubricant.
–  Drain fuel tank by way of filler neck.
–  Carefully remove the purge hose.
–  Connect battery. Observe measures to be taken after connecting the battery → Electrical system; Rep. gr.27.
  A20-0732

Fuel tank with accessory parts: Removing and installing > < Fuel tank with accessory parts: Assembly overview