Leon Mk1
| Assembly overview |
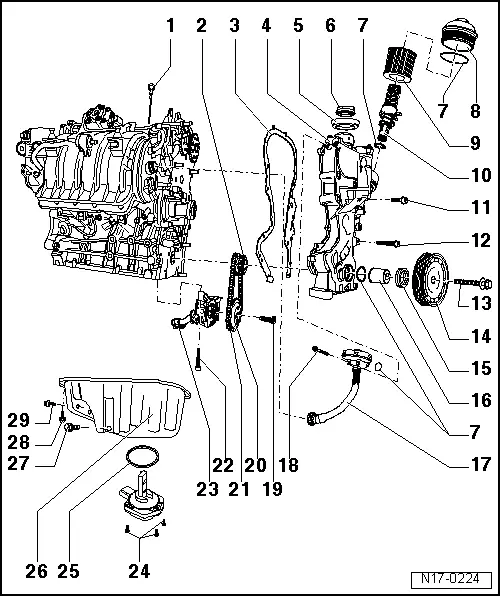
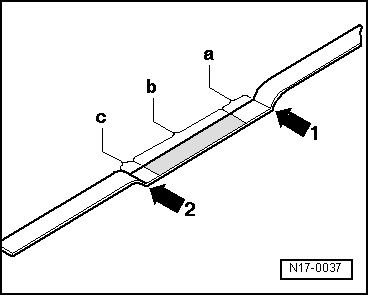
| 1 - | Oil dipstick |
| q | Oil level must not be above max. mark on dipstick! |
| q | Marks → Fig.. |
| 2 - | Sprocket |
| q | Removing and installing → Chapter |
| q | For driving oil pump |
| 3 - | Gasket |
| q | Renew |
| q | Should fit into the adjustment sleeves |
| 4 - | Control housing |
| q | Removing and fitting the distribution casing → Chapter |
| q | For ease of assembly, tighten two studs -M6x80- on the camshaft casing and the engine block |
| q | Fix the oil sump with two bolts to ease the fitting of the distribution casing. |
| 5 - | Oil seal |
| q | Replace this if it is damaged |
| 6 - | Plug |
| q | Renew seal if damaged |
| 7 - | O-ring |
| q | Renew |
| 8 - | Oil filter cover, 25 Nm |
| q | With bypass valve, opening pressure: 2.50 bar |
| q | With non-return valve |
| 9 - | Filter element |
| q | Note the replacement intervals |
| 10 - | Valve |
| 11 - | 10 Nm |
| 12 - | 10 Nm |
| 13 - | Securing bolt |
| q | Respect the tightening procedure → Chapter |
| q | Renew |
| q | The contact surface of the fastening bolt must be free of oil and grease |
| q | Apply oil before fitting it (thread) |
| q | Secure the pulley with the counterhold -3415- and -3415/1- to prevent it from turning |
| q | The torque angle can be measured with a Hazet 6690 torque or equivalent |
| 14 - | Pulley |
| q | Poly-V belt: removing and fitting → Chapter |
| q | The contact surfaces must be free of oil and grease. |
| q | Secure the pulley with the counterhold -3415- and -3415/1- to prevent it from turning |
| 15 - | Oil seal |
| q | Renew → Chapter |
| 16 - | Sleeve |
| q | The contact surfaces must be free of oil and grease. |
| 17 - | Oil deflector |
| q | With heated vacuum valve |
| 18 - | 10 Nm |
| 19 - | 20 Nm +1/4 turn further (90º) |
| q | Renew |
| 20 - | Sprocket |
| q | Removing and installing → Chapter |
| q | For oil pump |
| q | Immobilise using the retention tool -T10172-. |
| 21 - | Control chain |
| q | Removing and installing → Chapter |
| q | For oil pump |
| q | Mark D.O.R. before dismounting (installation position) |
| 22 - | 25 Nm |
| 23 - | Oil pump |
| q | Removing and installing → Chapter |
| q | Always replace assembly |
| 24 - | 10 Nm |
| q | Depending on version |
| 25 - | Oil level/oil temperature sender -G266- |
| q | Depending on version |
| 26 - | Sump |
| q | Clean sealing surface before installing |
| q | Assemble with silicone sealant D 176 404 A2 → Chapter |
| 27 - | Oil drain plug, 30 Nm |
| q | With safety seal |
| q | Renew |
| 28 - | Securing bolt |
| q | Aluminium oil sump: 13 Nm |
| q | Loosen and fasten the bolts on the side of the flywheel using the socket -T10058-. |
| 29 - | 45 Nm |