seat Workshop Repair Guides

SEAT Workshop Service and Repair Manuals

Fuel supply system: repairing > < Safety precautions when working on the fuel supply system
Fuel tank: Removing and installing
t  Removing → Anchor
t  Fitting → Anchor
t  Tightening torques → Anchor
Check the tool and equipment equivalence table according to the applicability between Seat / VW / Audi / Skoda → Chapter
Special tools and workshop equipment required
   
t  Tightening torque -VAG 1331-, see equivalent → Anchor
  W00-0427
t  Hydraulic jack -VAG 1383A-, see equivalent → Anchor
Removing
Observe safety precautions → Chapter.
Observe rules for cleanliness → Chapter.
  Note
t  To carry out this work it will be necessary to disconnect battery earth strap. Therefore check whether a coded radio is fitted. Where necessary, check the anti-theft coding first.
t  Carefully guide the fuel tank when lowering to avoid damage.
–  Disconnect earth wire at battery with ignition switched off → Electric system; Rep. Gr.27 .
l  The fuel tank must be empty when it is removed from the vehicle in order to reduce weight. Drain the tank if necessary.
  W00-0120
–  Remove rear right seat → Bodywork - interior fitting work; Rep. Gr.72.
–  Release retainers -arrows- at cover for sealing flange.
  A20-1066
–  Release carefully electrical connection -arrow- on sealing flange and take off.
  A20-1067
–  Remove rear right wheel housing protection → Bodywork, exterior fitting work; Rep. Gr.50 .
–  Open cap on fuel tank.
–  Clean the area around fuel filler neck.
–  Remove cap -arrow- from fuel tank filler neck.
–  Cover the fuel tank filler neck opening with a spongy material cloth to avoid penetration of dirt.
  A20-1068
–  Remove bolts -1- for fuel filler neck.
–  Detach electric cable -2- of speed sensor for ABS from retainer on fuel filler neck.
  A20-1069
–  Remove exhaust system from double clamp -arrows-.
–  Loosen exhaust system clamp and push clamps towards the rear.
  V26-0733
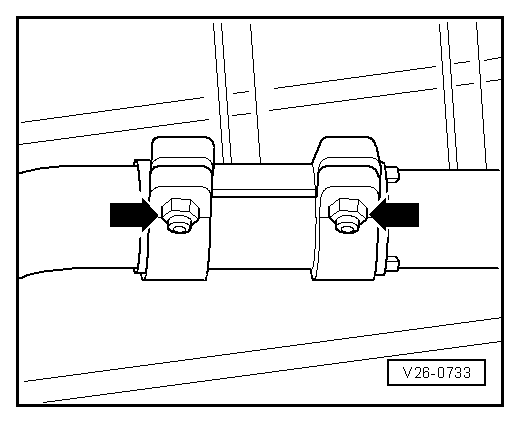
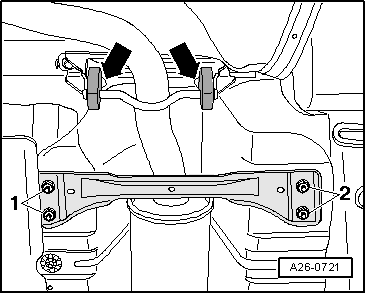
–  Remove vehicle floor rear cross member -nuts 1 and 2-.
  Note
A second mechanic is required for removing the rear section of the exhaust system.
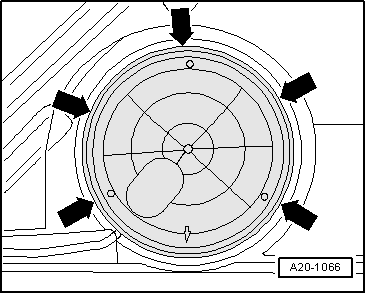
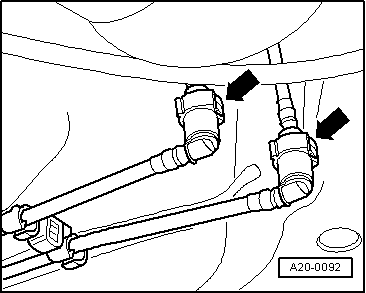
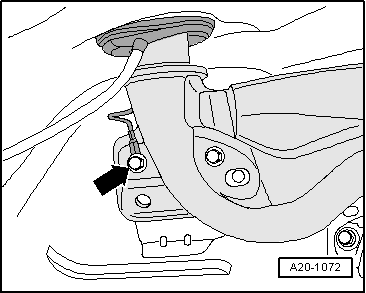
–  Unhook exhaust system on mounting -arrows-.
–  Take rear silencer off mountings and take off rear part of the exhaust system.
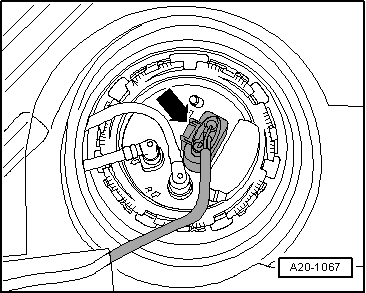
  WARNING
t  Fuel system is under pressure! Before opening the system place a cloth around the connection. Then release pressure by carefully loosening the connection.
t  For those vehicles fitted with an injector pump, the temperature of the fuel and the fuel lines may reach up to 100 ºC in extreme cases. Before opening the duct connections, allow the fuel to cool otherwise there is a risk of severe burns.
t  When carrying out work on the fuel system, always wear gloves and protective glasses.
  A26-0721
–  Disconnect the fuel supply tube -black- and the fuel return tube -blue- to the front right on the fuel tank; for this, press on the release tabs -arrows-.
  A20-0092
–  Unscrew bolts -1- and -3- first.
  WARNING
The fuel tank must be empty when it is removed from the vehicle in order to reduce weight.
–  Use engine/gearbox jack -VAG 1383 A- to support fuel tank.
–  Unscrew bolts -2- and -4-.
–  Lower fuel tank downwards by turning appropriately and take out.
Installing
Fit in reverse order from removal, remembering the following:
  Note
Secure all hose connections with the correct hose clips (same as original equipment) → ETKA (Electronic parts catalogue).
  A20-1071
–  Check whether the earth connection has oxidation traces on both connections. If necessary, eliminate these.
–  Check installation position of earth connection:
l  Ensure connector -3- is seated properly on metal ring -2-.
l  The contact tab -4- must be hooked on the fuel tank -1- and secured using a distance bushing -5-.
  A20-1112
–  Place the fuel tank with the securing straps in the lower part of the vehicle using the hydraulic jack -VAG 1383A-.
–  When positioning the fuel tank, observe that the filler neck fits correctly in body opening.
–  Firmly fit fuel tank on securing points -2- and -4- first, and then -1- and -3- (26 Nm).
  A20-1071
–  Secure contact tab of earth wire to fuel filler neck with collared securing bolt -arrow-.
  WARNING
After installation, use an ohmmeter to check the electrical connection between the metal ring on the fuel filler neck and a bare metal part on the body:
Specification: approx. 0 Ohm
–  Attach electric cable of speed sensor for ABS onto retainer on fuel filler neck.
–  Install rear section of exhaust system → Chapter.
–  Fit rear right wheel housing protection → Bodywork, exterior fitting work; Rep. Gr.66 .
Tightening torques
  A20-1072
Component Nm
Tensor strip to chassis26
Fuel tank to body26
Fuel filler neck to the wheel housing11


Fuel supply system: repairing > < Safety precautions when working on the fuel supply system