| –
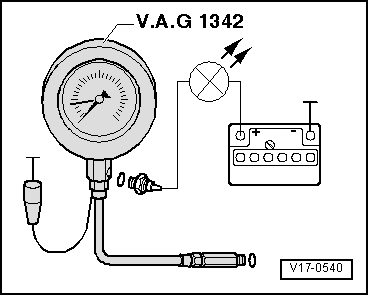
| Remove the oil pressure switch -F1- and thread it onto the gauge. |
| –
| Thread the gauge into the cylinder head, in the place of the oil pressure switch. |
| –
| Connect the brown wire of the gauge to earth (-). |
| –
| Connect diode lamp -V.A.G 1527 B- with auxiliary leads of the -V.A.G 1594 A- to battery positive (+) and to the oil pressure switch. The diode lamp should not light up. |
| –
| If the diode lamp lights up, replace the oil pressure switch. |
| If the diode lamp does not light up: |
| –
| Start the engine and slowly raise the revs.Between 0.3...0.7 bar of pressurethe diode lamp should light up; if not, replace the oil pressure switch. |
| –
| Continue increasing the revs. To 2000/min; at an oil temperature of 80°C, the oil pressure should be at least 2.0 bar. |
| At higher revs, the oil pressure should not exceed 7.0 bar. If necessary, replace the oil pump cover with the discharge valve. |
|
|
|
 Note!
Note!