seat Workshop Repair Guides

SEAT Workshop Service and Repair Manuals

Cylinder head > < Toothed belt - exploded view
Removing and installing toothed belt
t  Removing → Anchor
t  Fitting → Anchor
Consult the equivalence table for tools and equipment according to applicability among Seat / VW / Audi / Skoda → Chapter.
   
Special tools and workshop equipment required
t  Hose clamp -3359-, see equivalent → Anchor
t  Hose clamp -T10050-, see equivalent → Anchor
t  counterhold -T10172-, see equivalent → Anchor
t  Spanner -T10264-, see equivalent → Anchor
t  Hose clamp -T10265-, see equivalent → Anchor
t  Socket XZN 10 -T10385-, see equivalent → Anchor

Removing
  Note
Adjustment work on toothed belts must be performed only on cold engines, as the indicator position on the tensioning element varies depending on the engine temperature.
   
–  Remove engine cover panel -arrows-.
  E10-10127
–  Open clips -arrows- and remove toothed belt cover.
–  Remove vibration damper → Chapter.
  A10-11056
–  Remove bolts -arrows-.
–  Detach toothed belt cover (bottom).
–  Rotate crankshaft by turning bolt on crankshaft sprocket until camshaft sprocket is positioned at „TDC“.
  N13-10350
–  Immobilise the notched belt crankshaft sprocket, with the puller -T10050-.
  Note
t  The mark of the crankshaft sprocket -2- must correspond with the mark of the Support tool-1-. The pin of the crankshaft immobiliser -T10050- must fit in the sealing flange hole.
t  Crankshaft stop can only be pushed onto toothed belt sprocket from face end of splines.
  A13-0350
–  Loosen bolts -arrows- approx. 90° for camshaft toothed belt pulley. 90°.
  Note
Disregard -arrows-.
  A15-10798
–  Unscrew mounting bolts -1- for toothed belt sprocket on high pressure pump with socket wrench XZN 10 -T10385-approx. 90°.
  A15-11049
–  Loosen the securing nut -1- of the tensioning roller.
–  Turn the cam of the tensioning roller to the left using the wrench -T10264--arrow-, until the tensioning roller can be locked using the pinning tool -T10265-.
  N15-10332
–  Then turn the cam of the tensioning roller to the right until the end using the wrench -T10264--arrow- and tighten the nut -1- by hand.
  Caution
If a used belt runs in the opposite direction when it is refitted, this can cause breakage.
Before removing, mark direction of rotation of toothed belt with chalk or felt-tip pen for re-installation.
–  Take off the toothed belt first from idler roller and then from the remaining toothed wheels.
Installing (adjusting valve timing)
l  Tightening torque → Chapter „Toothed belt - exploded view“
  Note
Perform adjustments on toothed belt only when engine is cold.
  Caution
Avoid damage to valves and piston crowns.
The crankshaft must not be at „TDC“ at any cylinder when the camshaft is turned.
  N15-10333
Conditions:
l  Tensioning roller is locked with locking tool -T10265- and secured at right stop with nut -1-.
  N15-10333
l  The hub of the camshaft is arrested by the counter holder -3359-.
l  Bolts -arrows- are fitted but not tightened.
l  It should just be possible to turn the sprocket on the camshaft without axial movement.
  A15-10798
l  Crankshaft locked in position with crankshaft stop -T10050-.
  A13-0350
l  The hub of the high pressure pump is arrested by the counter holder -3359-.
l  Bolts -1- are fitted but not tightened.
l  The high-pressure pump sprocket should still just turn, but there must be no axial movement.
  Note
  A13-10615
If necessary, apply a screwdriver -arrows- to bolt heads -1- and turn the high-pressure pump hub until it can be locked with the locking pin.
  N15-10427
–  Turn the camshaft sprocket and high-pressure pump sprocket to the right as far as the stop.
–  Fit toothed belt in sequence described:
1 - Crankshaft gear
2 - Tensioning roller
3 - Camshaft sprocket
4 - Coolant pump sprocket
5 - High-pressure pump sprocket
6 - Idler roller
  A13-10540
–  Unscrew the securing nut of the tensioning roller and remove the Locking tool -T10265-.
  Note
-Arrow- can be disregarded.
  Note
  N15-10333
Ensure that tensioning roller seats correctly in rear toothed belt guard -arrow-.
  N15-10424
–  Position counterhold tool -T10172- on camshaft sprocket as shown in illustration.
–  Apply force to counterhold tool in anti-clockwise direction -arrow- and maintain tension.
–  Tighten the mounting bolts -1- for the cam shaft sprocket and the bolts -2- for the toothed belt sprocket on the high pressure pump in this position.
l  Tightening torque: 20 Nm
  A13-10614
–  Turn off-centre adjustment of tension roller clockwise using the Allen key -T10264- counter-clockwise -arrow- until the pointer -2- aligns with the middle of the cut-out of the base plate.
l  Nut -1- must not turn.
–  Hold tensioning roller in this position and tighten nut.
–  Remove the counter holder -3359- and the immobiliser -T10050-.
Checking valve timing:
  Caution
Risk of destruction due to toothed belt jumping.
Only turn crankshaft in engine direction of rotation.
–  Turn crankshaft two rotations in direction of engine rotation by turning bolt for crankshaft sprocket until crankshaft is just before „TDC“.
  N15-10334
–  Attach thecrankshaft stop -T10050- to the toothed belt sprocket on the crankshaft again.
–  Then turn the crankshaft in direction of engine rotation until the pin -arrow- on the crankshaft stop engages in the sealing flange as the crankshaft rotates.
  N15-0446
l  It should be possible to arrest the cam shaft hub with the crankshaft stop -3359-.
  Note
Disregard -arrows-.
  A15-10798
l  It is very difficult to reproduce the locking position of the high-pressure pump hub. However, a slight deviation -arrow- does not influence the engine operation.
  N15-10426
l  
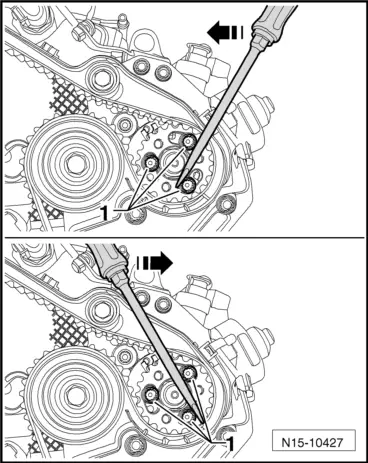
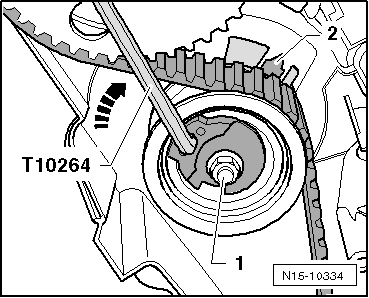
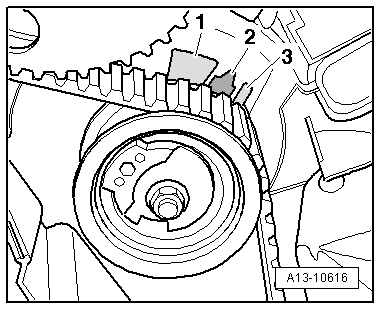
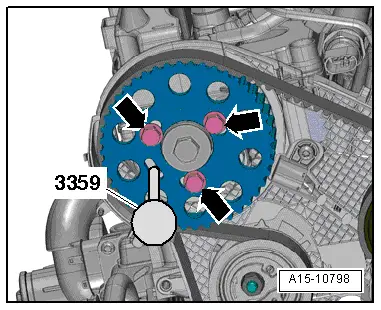
Pointer -2- on tensioner roller must be centred between tabs -1- and -3- on base plate.
  Note
The maximum permissible sideways deviation from the specified position is 5 mm.
t  Re-adjust valve timing if requirements are not met → Anchor.
t  If requirements are met, continue with procedure after adjusting valve timing correctly as described below → Anchor.
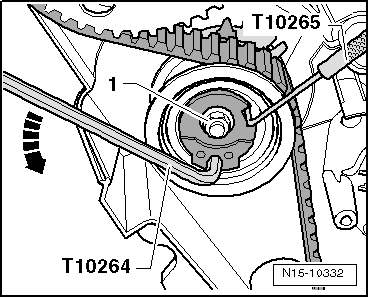
Re-adjusting valve timing:
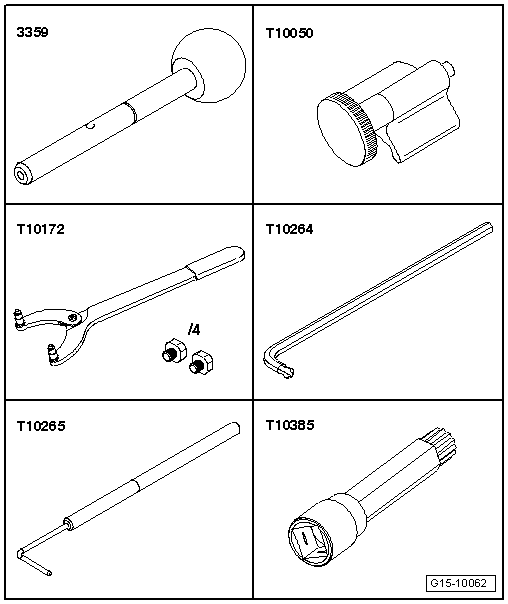
If hub on camshaft cannot be locked:
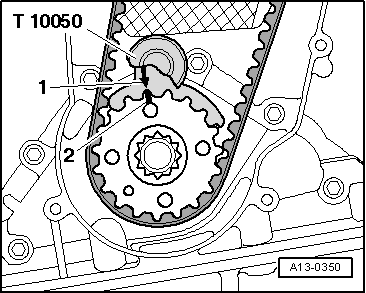
–  Move the crankshaft stop -T10050- back until the journal releases the opening.
–  Turn crankshaft in opposite direction of engine rotation slightly past „TDC“.
–  Now turn crankshaft slowly in direction of engine rotation until camshaft hub can be secured in position.
–  After locking, loosen securing nuts of crankshaft toothed belt pulley.
  A13-10616
A -The pin on the counter holder -T10050- is located to the left of the opening:
–  Turn crankshaft in direction of engine rotation until pin of crankshaft stop engages in sealing flange as crankshaft rotates.
–  Tighten the mounting screws on the toothed belt sprocket for the cam shaft to a torque of 20 Nm.
A -The pin on the counter holder -T10050- is located to the right of the opening:
–  Turn crankshaft slightly opposite engine direction of rotation.
–  Turn crankshaft in direction of engine rotation until pin of crankshaft stop engages in sealing flange as crankshaft rotates.
–  Tighten the mounting screws on the toothed belt sprocket for the cam shaft to a torque of 20 Nm.
Procedure after adjusting valve timing correctly:
–  Remove the retention tool -3359- and the crankshaft positioning device -T10050-.
–  Turn crankshaft two rotations in direction of engine rotation by turning bolt for crankshaft sprocket until crankshaft is just before „TDC“.(PMS).
–  Repeat check → Anchor.
–  If the hub of the camshaft can now be locked, tighten the bolts again as follows:
  N15-0446
t  If it is now possible to arrest the cam shaft, tighten bolts -1- for toothed belt sprocket on cam shaft to final torque.
–  Tighten bolts -2- for toothed belt sprocket on high pressure pump to final torque.
–  Check valve timing once again → Anchor.
Assembling
Reassembly is carried out in the reverse order; note the following:
l  Tightening torque → Chapter „Toothed belt - exploded view“
–  Install vibration damper → Chapter.
  Note
t  Renew seals
t  Secure all hose connections with the correct type of hose clips (same as original equipment) → Electronic parts catalogue.
  A13-10614

Cylinder head > < Toothed belt - exploded view