seat Workshop Repair Guides

SEAT Workshop Service and Repair Manuals

Sealing flange, flywheel side: removing and installing > < Crankshaft oil seal- pulley side: replace
Removing and installing sealing flange - pulley end
t  Removing → Anchor
t  Fitting → Anchor
t  Tightening torques → Anchor
Consult the equivalence table for tools and equipment according to applicability among Seat / VW / Audi / Skoda → Chapter.
   
Special tools and workshop equipment required
t  Torque wrench kit -SAT 8010-, see equivalent → Anchor
t  Hose clamp -T20018B-, see equivalent → Anchor
t  Guide sleeve -T20081B-, see equivalent → Anchor
t  Electric drill with plastic brush
t  Silicone sealant → Spare parts catalogue
t  Flat scraper

Removing
–  Remove toothed belt → Chapter.
   
–  Remove the notched belt-crankshaft sprocket. To do this, immobilise the notched belt sprocket using the retention tool -T20018B-.
–  Drain engine oil.
–  Remove sump → Chapter.
–  Extract the attachment bolts of the seal flange.
–  Remove sealing flange. If necessary, loosen by giving light taps with a rubber hammer.
Fitting
–  Remove sealant remaining on cylinder block with flat scraper.
  WARNING
Wear eye protection.
  E13-10019
–  Remove sealant remaining on sealing flange with rotating plastic brush (wear eye protection).
–  Clean sealing surfaces; they must be free of oil and grease.
  Note
Lie a cloth over the open part of the oil sump.
  Note
t  Observe use-by date of sealant.
t  The sealing flange should be fitted into place 5 minutes after the application of the sealant.
–  Cut off tube nozzle at upper marking (nozzle approx. approx. 3 mm).
  A17-0030
–  Apply the silicone sealant bead to the clean sealing surface of the sealing flange as shown in the figure.
  Note
  N17-0084
t  
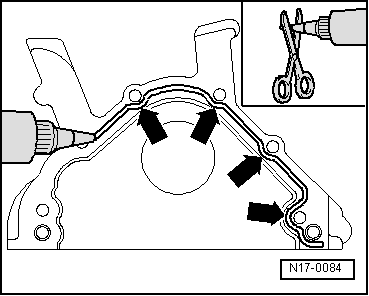
Thickness of sealant bead -arrows-: 2 ... 3 mm
t  The sealing length should not be thicker, if so, sealant may drip on to the oil sump, obstructing the collector of the intake tube of the oil pump. Furthermore, the sealant may drip onto the sealing ring of the crankshaft.
t  Before the application of the length of sealant, cover the contact surface using a clean cloth.
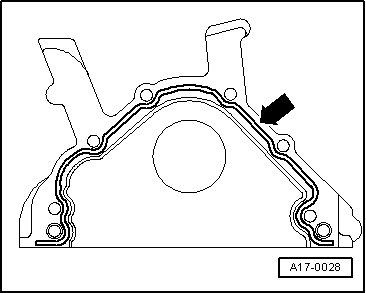
–  Fit sealing flange immediately and tighten all bolts slightly.
–  Use the adaptor -T20081/6- to centre sealing flange with the oil seal already installed.
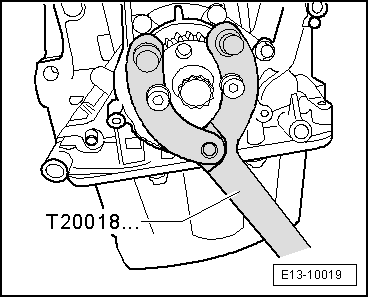
–  Tighten sealing flange securing bolts diagonally and alternately.
–  Fit the oil sump → Chapter.
  Note
Let sealing compound dry for approx. 30 minutes after installing oil sump. Only then should the engine be refilled with oil.
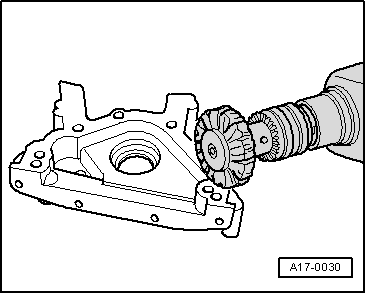
–  Fit the crankshaft notched belt sprocket and continue the rest of the fitting in the reverse order of removal.
Tightening torques
  A17-0028
Component Nm
Crankshaft sprocket120 + 90° → Remark → Remark
Sealing flange to cylinder block 15

1)  Renew bolt
2)  90° is the equivalent of (1/4 turn)
   

Sealing flange, flywheel side: removing and installing > < Crankshaft oil seal- pulley side: replace