seat Workshop Repair Guides

SEAT Workshop Service and Repair Manuals

Piston and piston rod: > < Crankshaft
Sealing flange on the pulley side: removing and fitting
Removing → Anchor.
Installing → Anchor.
   
Consult the equivalence table for tools and equipment according to applicability among Seat / VW / Audi / Skoda → Chapter.
Special tools and workshop equipment required
t  Retention tool -3415-, see equivalent → Anchor
t  Mounting tool -T10053-, see equivalent → Anchor
t  Torque wrench -V.A.G 1331-, see equivalence → Anchor
t  Torque wrench -V.A.G 1332-, see equivalence → Anchor
t  Hand drill with plastic brush
t  Flat scraper
t  Silicone sealant → Spare parts catalogue

removing
–  Remove Poly V-belt → Chapter.
–  Remove the notched belt → Chapter.
–  Turn crankshaft back slightly.
   
–  Remove the notched belt-crankshaft sprocket. Immobilise the notched belt sprocket using the counterhold -3415-.
–  Drain the engine oil.
–  Remove sump → Chapter.
–  Loosen the sealing flange, pulley side.
–  Remove sealing flange. If necessary, loosen by giving light taps with a rubber hammer.
–  Remove sealant residue on cylinder block with a flat scraper.
–  Cover the seal with a clean cloth.
  N13-0401
–  Remove sealant remaining on sealing flange with rotating plastic brush (wear eye protection).
–  Clean sealing surfaces. The sealing surfaces must be free of oil and grease.
Fitting
  A17-0030
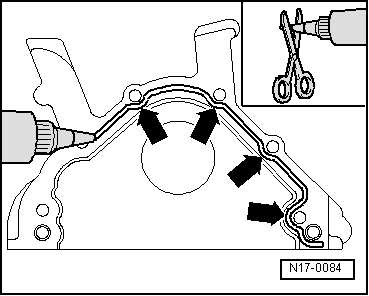
–  Cut nozzle off tube at front marking (Ø nozzle diameter approx. 3 mm).
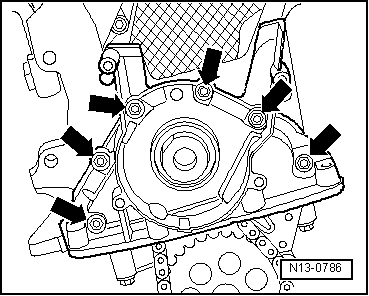
–  A layer of adhesive sealing material of approximately 2-3 mm as shown in -arrow- on the clean, apply sealed surface of the sealing flange.
  Note
t  Before applying the strip of sealant, clean the seal with a clean cloth.
t  The strip of sealant must not be thicker than 2 - 3 mm, otherwise the excess sealant may enter the oil sump and obstruct the strainer in the oil intake pipe.
t  Observe use-by date of sealant.
t  The sealing flange must be installed within 5 minutes of applying silicone sealant.
t  Once the seal is installed, use the guide sleeve -T10053/1- to position the sealing flange.
t  After fitting sump, allow the sealant to dry for approx. 30 minutes. Only then should the engine be refilled with oil.
  N17-0084
–  Fit the sealing flange immediately, and tighten all bolts slightly -arrows-.
–  Tighten diagonally the attachment bolts of the seal flange. Tightening torque: 15 Nm.
–  Clean off any excess sealant.
–  Fit the oil sump → Chapter.
–  If necessary, fit seal → Chapter
  Note
t  There should be no oil on the contact surface between the notched pulley, the diamond-coated washer and the crankshaft.
t  Replace the centre bolt.
t  The thread and collar must be free of oil and grease.
  N13-0786
–  Fit the notched pulley -2- with a diamond-coated washer -3- and tighten the bolt by hand -1-.
  A13-10316
–  Immobilise the notched belt sprocket using the counterhold -3415-.
–  Tighten the new centre bolt to a torque of 90 Nm + 1/4 turn (90°) (the retightening can be done in several stages).
Continue installation following reverse order for removing.
Installing toothed belt and adjusting valve timing → Chapter.
  N13-0401

Piston and piston rod: > < Crankshaft