seat Workshop Repair Guides

SEAT Workshop Service and Repair Manuals

Oil pump: removing and installing > < Coarse oil separator: Removing and installing (engine codes BZB - CCZB - CDAA)
Remove and install the lower element of the oil tray
Removing → Anchor.
Installing → Anchor.
   
Consult the equivalence table for tools and equipment according to applicability among Seat / VW / Audi / Skoda → Chapter.
Special tools and workshop equipment required
t  Articulated wrench e/c 10 -3185-, see equivalent → Anchor
t  Measuring container -T10058-, see equivalent → Anchor
t  Torque wrench -V.A.G 1331-, see equivalent → Anchor.
t  Electric drill with plastic brush attachment
t  Flat scraper
t  Silicone sealant → Spare parts catalogue

Removing
   
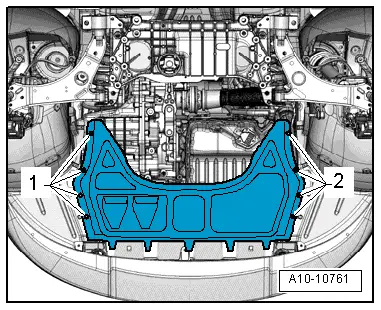
–  Release the fasteners -1 and 2- to remove the central soundproofing sump.
  A10-10761
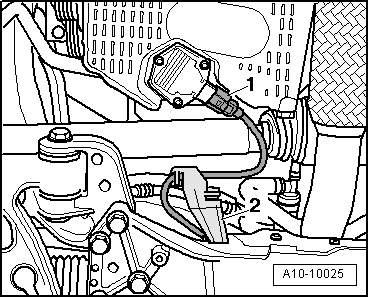
–  Disconnect the plug connection -1- from the oil level and oil temperature sender -G266- (depending on the version).
–  Drain the engine oil.
  A10-10025
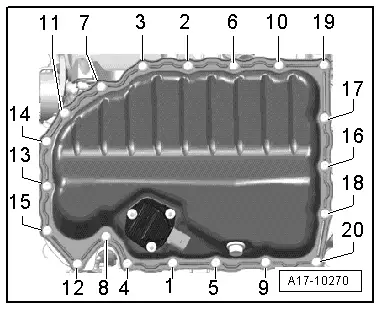
–  Extract bolts -1... 20- crosswise.
–  Take off sump: if necessary loosen it by striking lightly with a rubber hammer.
Fitting
t  Silicone sealant → Spare parts catalogue
  Note
t  Note expiry date of silicone sealant.
t  The sump must be installed within 5 minutes after applying the silicone sealant.
–  Eliminate any sealant paste from the upper elements of the oil sump using a flat scraper.
  WARNING
Wear eye protection.
  A17-10270
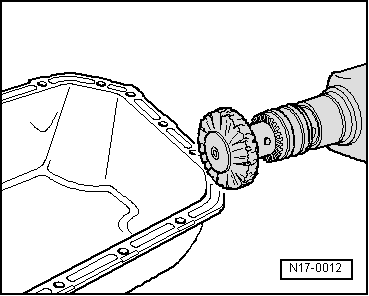
–  Eliminate sealant paste remains from the lower oil sump element (for example, using a rotating plastic brush).
–  Clean sealing surfaces; they must be free of oil and grease.
  N17-0012
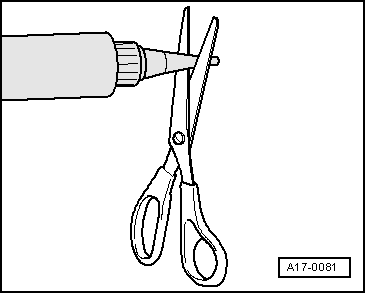
–  Cut off the tube nozzle on the front marking (diameter of the nozzle approximately. 3 mm).
  A17-0081
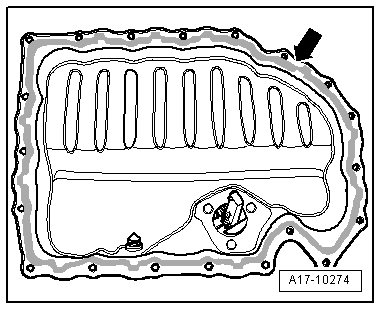
–  Apply a line of silicon sealant, as shown in the figure, to the clean surface of the oil sump seal.
t  Thickness of the sealant grub: 2 to 3 mm.
  Note
t  The sump must be installed within 5 minutes after applying the silicone sealant.
t  The bead of sealant must not be thicker than specified, otherwise excess sealant can enter the sump and obstruct the strainer in the oil intake pipe.
t  In the area of the rear sealing flange, take special care applying the bead of sealer -arrows-.
  A17-10274
–  Install oil sump immediately and tighten bolts in the indicated sequence.
  Note
Let sealing compound dry for approx. 30 minutes after installing oil sump. Only then should the engine be refilled with oil.
–  Fill up with engine oil and check the oil level → Booklet3.
Further assembly is basically the reverse of the dismantling sequence.
  A17-10270

Oil pump: removing and installing > < Coarse oil separator: Removing and installing (engine codes BZB - CCZB - CDAA)