
Leon Mk1
|

| 1 - | Vibration damper |
| q | With poly V-belt pulley |
| q | Removing and installing → Chapter. |
| 2 - | O ring |
| q | Replace |
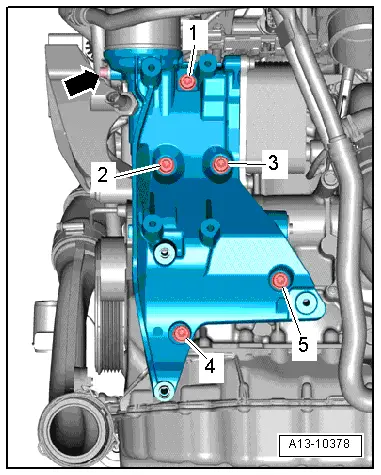
| 3 - | Bolt. |
| q | Replace |
| q | 150 Nm + further 1/4 (90°) |
| q | Loosen and tighten using the wrench -T10355- |
| 4 - | Poly-V belt |
| q | Check for wear |
| q | Do not kink |
| q | Removing and installing → Chapter. |
| q | When fitting ensure that it is correctly seated on the pulleys |
| 5 - | Poly V-belt tensioning element |
| q | Swivel with open-ended spanner to slacken poly V-belt |
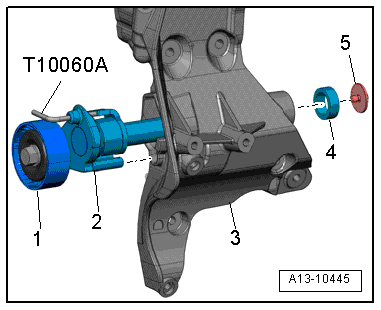
| q | Immobilise using the retention tool -T10060 A- |
| q | Components of tension device for Poly-V belt → Fig. |
| q | Removing and installing → Chapter. |
| 6 - | Bracket for ancillary mechanical units |
| q | With oil filter and oil cooler |
| q | Removing and installing → Chapter. |
| q | Oil cooler: removing and fitting → Chapter |
| 7 - | Bolt. |
| q | 10 Nm. |
| 8 - | Alternator |
| q | Removing and installing → Rep. gr.27. |
| 9 - | Bolt. |
| q | 23 Nm. |
| 10 - | Bolt. |
| q | Tightening sequence → Fig. |
| 11 - | Air conditioning compressor |
| q | Do not unscrew or disconnect refrigerant hoses or pipes. |
| q | Removing and installing → Rep. gr.87. |
| 12 - | Bolt. |
| q | 25 Nm. |
| 13 - | Dowel sleeve |
| q | For air conditioner compressor |
|
|
|
|
|