seat Workshop Repair Guides

SEAT Workshop Service and Repair Manuals

Removing and installing tensioner for poly V-belt > < Poly-V belt: Assembly overview
Removing and installing poly V-belts
Removing → Anchor.
Installing → Anchor.
Consult the equivalence table for tools and equipment according to applicability among Seat / VW / Audi / Skoda → Chapter.
Special tools and workshop equipment required
   
t  Hose clamp -T10060A-, see equivalent → Anchor
Removing
  W00-10235
–  Disconnect the vacuum pipe -1- to the active carbon filter by pressing the release tab.
–  Separate the vacuum pipe from the refrigerant tubes.
  Note
Disregard: -Pos. 2-.
  A10-10762
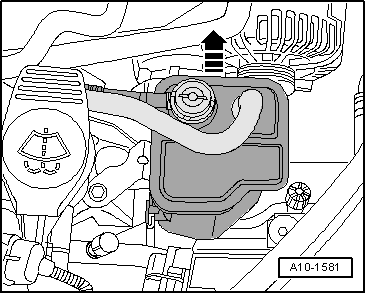
–  Remove the active carbon deposit from the bracket by pulling upwards -arrow- and leave it to one side with all the connections in place.
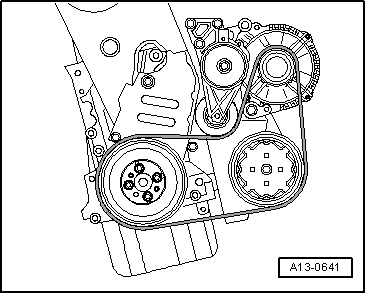
  Caution
If the poly V-belt runs in the opposite direction when it is refitted, this can cause breakage.
Before removing, mark direction of rotation of toothed belt with chalk or felt-tip pen for re-installation.
  A10-1581
–  To release tension on the Poly-V belt, turn the tensioning device in the -direction of the arrow-.
–  Secure tensioner with locking pin -T10060 A-.
–  Take off poly V-belt.
Fitting
Reassembly is carried out in the reverse order; note the following:
  Note
Before fitting the Poly-V belt securely tighten the alternator and the air-conditioning compressor.
  A13-10441
–  Fit the Poly V-belt onto the crankshaft, the alternator and air conditioner compressor pulleys.
  A13-0641
–  Lock the tension devices with a ring spanner and extract the pin -T10060 A-.
–  Release the tension devices.
–  Check that poly V-belt is properly seated.
–  Start engine and check that poly V-belt runs properly.
  A13-10441

Removing and installing tensioner for poly V-belt > < Poly-V belt: Assembly overview