seat Workshop Repair Guides

SEAT Workshop Service and Repair Manuals

Engine lubrication > < Cylinder head
Removing and fitting the distribution chain
   
Removing and fitting the distribution chain
Special tools and workshop equipment required
t  Locking pin -T10060 A-
t  Counterhold tool -T10355-
t  attachment tool -T10352/1-
t  Locking pin -T40011-
t  Torque wrench -V.A.G 1331-

Removing:
–  Remove timing chain cover (top) → Chapter.
   
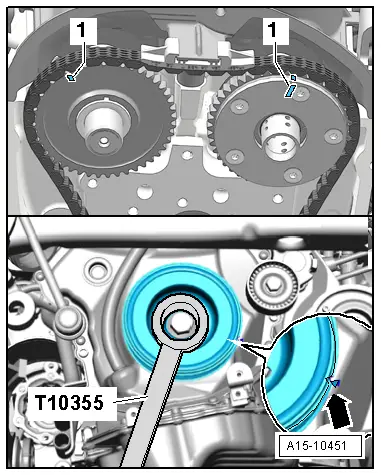
–  Turn vibration damper to „TDC“ position -arrow- using counterhold tool -T10355-.
l  Notch on vibration damper must align with arrow marking on cover for timing chains (bottom).
l  The markings -1- on the camshafts must face upwards.
–  Remove timing chain cover (bottom) → Chapter.
  A15-10451
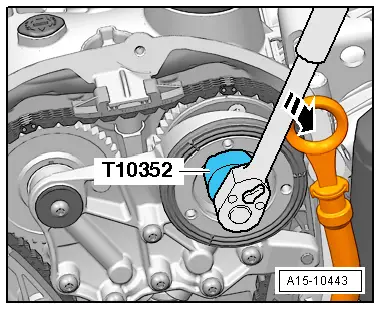
–  Remove timing valve by turning assembly tool -T10352/1- in direction of -arrow-.
  Caution
The control valve has a left hand side thread.
  A15-10443
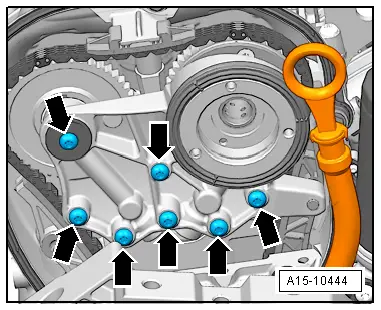
–  Remove bolts -arrows- and detach bearing saddle.
  A15-10444
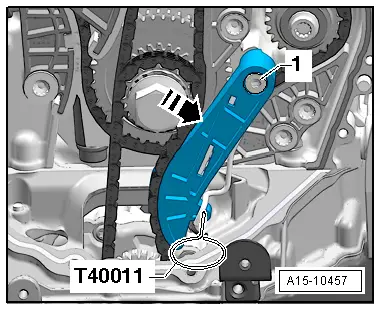
–  Press oil pump chain tensioner in direction of -arrow- and lock in place using locking pin -T40011-.
–  Remove oil pump chain tensioner -1-.
–  Remove oil pump chain.
To enable the chain tensioner to be slackened, the locking element in the chain tensioner must be raised. To do this, grind a 2nd  locking pin -T40011- to make the end pointed. A screwdriver with a blade width of approx. 1.5 mm can also be used.
  Caution
Risk of damaging the chain tensioner! Proceed with great care.
  A15-10457
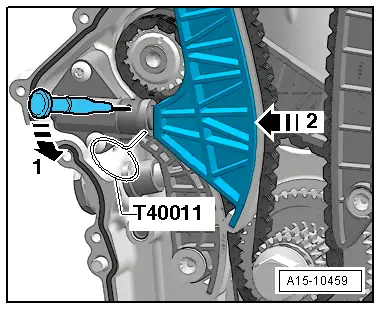
–  Use suitable tool to lift locking element of chain tensioner in direction of -arrow 1-, press tensioning rail for timing chain in direction of -arrow 2- and secure with locking pin -T40011-.
  A15-10459
–  Remove tensioning rail for timing chain -2-.
  Note
Inlet camshaft will move in direction of engine rotation.
–  Remove timing chain.
Installing:
l  Tightening torque → Chapter
l  Guide rail for camshaft timing chain is installed.
l  Chain tensioner for tensioning rail is installed
  Note
t  The following procedure must be performed in one operation; this requires the assistance of a second mechanic.
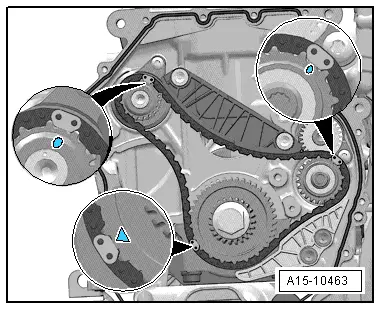
t  The timing chain links with coloured markings must be positioned at the markings on the chain sprockets.
t  Continue to hold inlet camshaft until tensioning rail is installed.
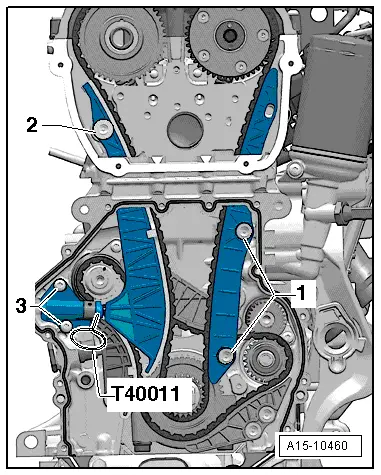
  A15-10460
–  Check TDC position of crankshaft.
  A15-10463
–  Fit timing chain onto exhaust camshaft.
–  Fit timing chain onto crankshaft.
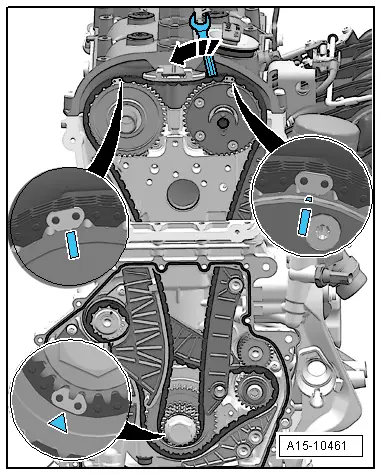
–  Use spanner to turn inlet camshaft in direction of -arrow- and fit timing chain. »Hold« the inlet camshaft in this position.
  A15-10461
–  Fit tensioning rail for timing chain and tighten bolt -2-.
–  Pull locking pin -T40011- out of chain tensioner.
  A15-10460
–  Attach bearing saddle and screw in bolts -arrows- hand-tight.
–  Tighten bolts -arrows- for bearing saddle → Chapter.
Further assembly is basically the reverse of the dismantling sequence.
  A15-10444

Engine lubrication > < Cylinder head