seat Workshop Repair Guides

SEAT Workshop Service and Repair Manuals

Anti-lock brake system ABS) - General Instructions > < Servicing notes for ABS
Removal
Removal
–  Check whether a coded radio is fitted and if so consult the anti-theft code.
–  Disconnect the battery.
–  Remove the coolant liquid expansion tank and set it to one side.
–  Remove as much brake fluid as possible from the brake fluid deposit, using an an extraction bottle.
–  Depress brake pedal and block it with shoe -V.A.G 1788/10- or make another mechanic press the pedal.
–  Fit the bleeding tube from the bleeding bottle to the bleeding screw of the front left brake clip and open it.
–  Close the front left bleeding screw.
   
–  Release connector from control unit -arrow 1- and pull off -arrow 2-.
–  Place a sufficiently large lint-free cloth under the control unit and the hydraulic unit.
Make sure that brake fluid does not fall onto the connectors.
–  Unscrew the brake pipes from the main cylinder and from the hydraulic unit; close off the brake tubes and the threaded openings with plugs from the repair unit, part nº -1H0 698 311 A-.
–  Extract the Torx T 25 support screws from the hydraulic unit.
–  Extract the hydraulic unit along with the control unit.
Unscrew control unit from hydraulic unit.
–  Disconnect the hydraulic pump motor connector from the control unit.
  N45-0069
–  Remove the bolts from the control unit remove the control unit.
  N01-0019
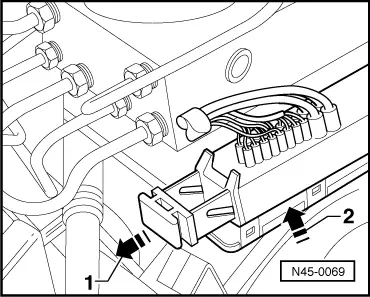
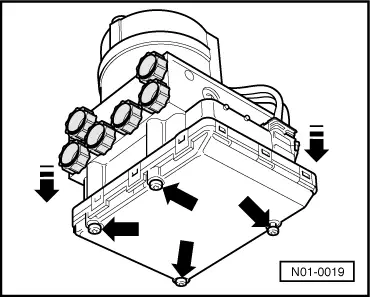
When removing the control unit, make sure that hydraulic unit valves do not remain tilted with respect to control unit solenoides.
Cover the control unit solenoides with a lint-free cloth.
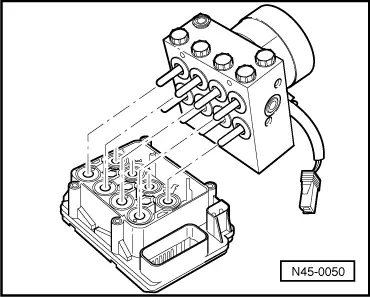
After separating the control unit from the hydraulic unit, cover the valves with transport protection → Chapter
  N45-0050

Anti-lock brake system ABS) - General Instructions > < Servicing notes for ABS