seat Workshop Repair Guides

SEAT Workshop Service and Repair Manuals

Rear brake calliper C38 and C38HR: Removing and installing > < Rear brakes C38 and C38HR: Assembly overview
Rear brake pads C38 and C38HR: Removing and installing
Removal:
  Note
If you are going to use the brake pads again, mark them when you remove them. Put them back in the same positions, otherwise, the braking effect will not be even.
–  Raise the vehicle.
–  Remove wheels.
   
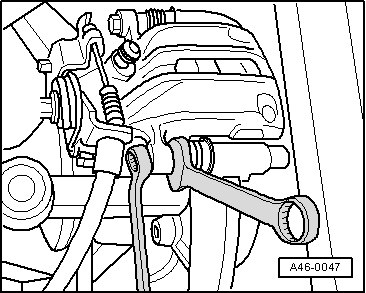
–  Remove securing bolts from brake calliper housing, when doing this counter-hold on guide pins.
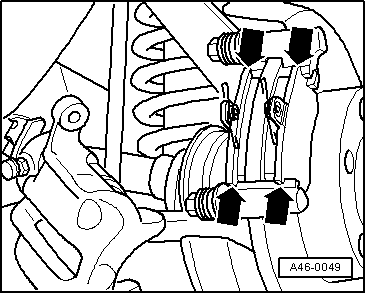
–  Take out brake pads.
  Note
t  
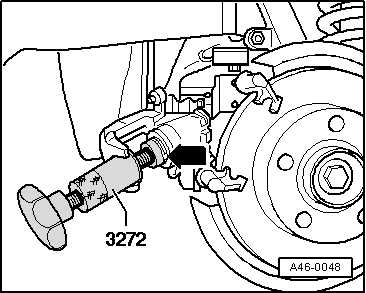
Push brake piston into cylinder with resetting tool before inserting brake pads. Before pressing the piston back, draw off brake fluid from the reservoir with a bleeder bottle. Otherwise, fluid can overflow and cause damage, particularly if reservoir has been topped up.
t  Insert special tool -3272- so that the collar is positioned against the piston.
  A46-0047
–  Screw in piston by turning special tool -3272- in clockwise direction.
Installation
Always use new bolts → Spare parts catalogue.
  Note
If applicable, remove soiling and corrosion present on contact surfaces between brake support plate and brake pads.
  A46-0048
–  Insert brake linings.
  A46-0049
–  Fit the brake calliper housing with the new autolocking bolts.
–  Tighten bolts on brake calliper housing (35 Nm).
  Note
t  Always use the four self-locking hex. head bolt included in the repair kit.
t  After replacing the brake pads, fully step on the brake pedal a few times with the vehicle stopped, so that the pads adapt to their working position.
–  Mount the wheels → Running gear, shafts, steering; Rep. gr.44
–  Check the brake fluid level and refill in case of doubt.
  A46-0047

Rear brake calliper C38 and C38HR: Removing and installing > < Rear brakes C38 and C38HR: Assembly overview