seat Workshop Repair Guides

SEAT Workshop Service and Repair Manuals

Tensioning V-belt > < Assembly overview - power assisted steering vane pump, vehicles fitted with 4-cyl. engines
Installing vane pump
  Note
Seating surfaces and threads must be free of paint on both sides of the vane pump.
   
–  Tighten vane pump -1- with bolts -3- in swivel bracket -2-.
–  Install bolts -4- and tighten.
–  Install pulley -6- on vane pump -1- and tighten.
Specified torques:
Bolts -3-, -4- and -5- → Chapter
  V48-1062
–  Install swivel bracket -2- and pump with fitted bolt -3- on bracket -4-.
–  Tighten fitted bolt -3- until threaded bushing M 10 -arrow- in swivel bracket -2- is resting against bracket -4-. (Do not yet tighten).
–  Insert hexagon bolt -5-. (Do not yet tighten).
  V48-1063
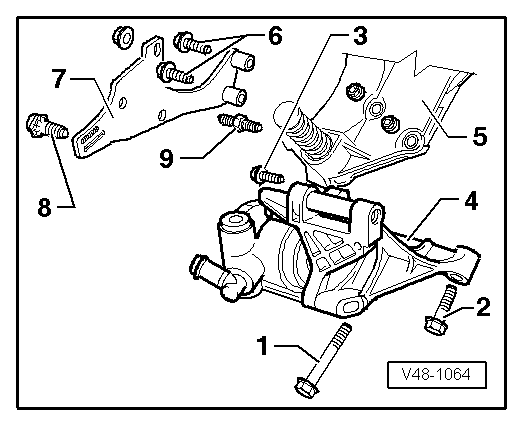
–  Fit bracket -4- together with vane pump and swivel bracket to console -5- and engine block.
–  First screw bolts -1-, -2- und -3- in a couple of turns and then tighten in sequence as numbered.
Nut -9- is only installed on vehicles with petrol engines.
–  Fit tensioning arm -7- onto engine block using hexagon bolts -6-.
–  Fit adjustment bolt -8- to swivel bracket.
–  Tighten hexagon bolts -6-.
–  Install V-belt and tension.
Observe oil level in reservoir, after filling with hydraulic oil and starting engine. The oil level must sink.
If this is not the case, stop engine, unscrew pressure pipe at P.A.S. box and wait until hydraulic oil discharges.
–  Attach pipe again and start engine, top-up oil level.
  V48-1064
Specified torques
BoltSpecified torque
Bracket for power steering vane pump to console/cylinder block25 Nm
Tensioner to cylinder block25 Nm
Swivel bracket to holder for vane pump45 Nm
Tensioning bolt to swivel bracket25 Nm


Tensioning V-belt > < Assembly overview - power assisted steering vane pump, vehicles fitted with 4-cyl. engines