skoda Workshop Repair Guides

Skoda Workshop Service and Repair Manuals

Checking semi-automatic tensioning pulley > < Removing
Install
Install
–  Check whether the TDC marking on the flywheel and the reference mark on the gearbox correspond.
–  Loosen the fixing screws of the camshaft sprocket by 1 turn.
  Note
The camshaft straightedge -MP1-312- must not be used for locking the camshaft sprocket. To loosen and tighten the fixing bolts always counterhold the camshaft timing gear with counterholder -MP1-216- or -T30004-.
   
–  Position extractor -T40001- with single-arm claw-A- and two-arm claw-B- on the hub of the camshaft timing gear and detach the camshaft timing gear.
   Counterhold the extractor with an open-end wrench -C-.
–  Place toothed belt on crankshaft-toothed belt gear, guide pulley, injection pump gear, coolant pump gear and tensioning pulley (pay attention to running direction).
–  Align the injection pump gear in middle position in the elongated holes.
–  Position the camshaft timing gear together with the toothed belt and attach with fixing bolt (the camshaft timing gear must still be able to rotate).
  M13-0002
–  Tighten the timing belt. To this end turn the nut wrench on the eccentric clockwise until the notch and the lobe -arrows- are opposite one another.
  Note
If the eccentric has been turned too far, the tensioning pulley must be fully slackened and tightened again.
–  Tighten the locking nut on the tensioning pulley.
   Tightening torque: 25 Nm
  Note
  A13-0050
Pay attention to the correct catch fitting of the tensioning pulley in the rear timing belt guard -arrow-.
–  Check the TDC marking on the flywheel once again.
–  Tighten the fixing bolts for the camshaft timing gear (counterhold camshaft timing gear with counterholder -MP1-216- or -T30004-).
   Tightening torque: 45 Nm
  A13-0053
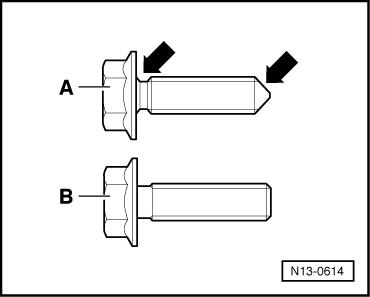
Version -A-: fixing screws with relief under the head and tip -arrows-
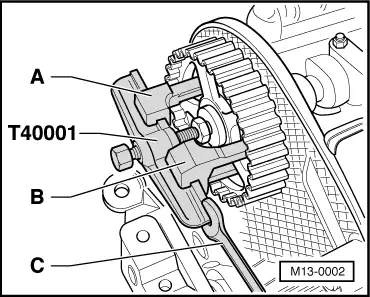
–  Tighten the new fixing bolts of the injection pump gear.
   Tightening torque: 20 Nm
  Note
t  After a dynamic test of the start of pump delivery tighten the fixing bolts to the torquing angle by 90° (1/4 turn).
t  The fixing bolts must be used once only as they are antifatigue bolts.
Version -B-: fixing screws without relief under the head and without tip
–  Tighten the old fixing bolts of the injection pump gear.
   Tightening torque: 25 Nm
  Note
Do not replace the fixing bolts.
Continued for all versions:
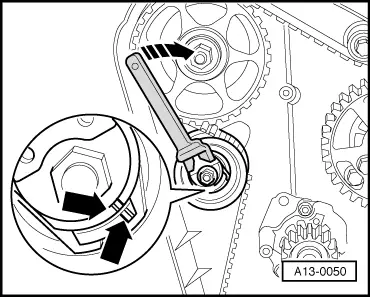
–  Remove the camshaft straightedge -MP1-312- from the camshaft.
–  Pull out the rig pin -MP1-301-.
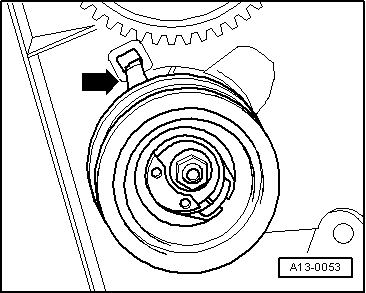
–  Turn crankshaft two turns further in the direction of running of the engine and again position on TDC for cylinder 1.
–  Check whether:
t  the TDC marking on the flywheel is aligned,
t  the camshaft straightedge can be inserted in the camshaft,
t  the rig pin is inserted in the injection pump gear,
t  the setting of the tensioning pulley (notch/lobe) is aligned.
–  If the notch and the lobe are not opposite one another, tighten the tensioning pulley and the fixing nut to 25 Nm.
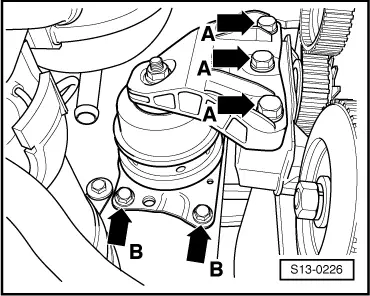
–  Turn crankshaft two turns further in the direction of running of the engine until the crankshaft is again on TDC for cylinder 1.
–  Repeat check.
–  Fit engine support bracket on the cylinder block.
   Tightening torque: 45 Nm
  N13-0614
–  Install engine mounting -arrows A- (replace fixing bolts).
   Tightening torque: 30 Nm + torque a further 90° (1/4 turn)
–  Screw on engine mounting -arrows B- (replace fixing bolts).
   Tightening torque: 20 Nm + torque a further 90° (1/4 turn)
–  Install vacuum pump.
–  Install middle and bottom toothed belt guard, toothed belt sprockets and cylinder head cover.
–  Install the V-ribbed belt → Chapter.
–  Install the noise insulation.
–  Dynamically test the start of pump delivery of the injection pump → Chapter.
  Note
If the start of pump delivery does not need adjusting, tighten fixing bolts version -A- → Fig. for the injection pump gear to the torquing angle by 90° (1/4 turn).
–  Install top timing belt cover and engine cover.
  S13-0226

Checking semi-automatic tensioning pulley > < Removing