skoda Workshop Repair Guides

Skoda Workshop Service and Repair Manuals

Removing and installing the sender for fuel gauge displayG > < Fuel filter - Summary of components
Removing and installing the flange for the sender for fuel gauge displayG
Removing and installing the flange for the sender for fuel gauge display -G-
Observe safety measures → Chapter.
Observe rules for cleanliness → Chapter.
Special tools and workshop equipment required
t  Wrench for union nut -MP1-227-
Removing
–  Switch off ignition and withdraw ignition key.
   
–  Press off cover -1- (below rear seat).
   The rubber grommet -2- may remain fitted.
–  Detach the feed line (black) -5- and the return-flow line (blue) -4- from the flange of the sender for fuel gauge display -G-. To do so press the release buttons → Chapter.
–  Disconnect the 2-pin plug -3- and pull out of the flange of the sender for fuel gauge display -G-.
  S20-0092
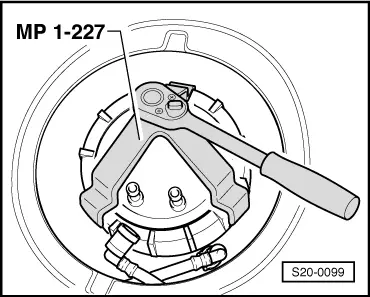
–  Unscrew union nut with wrench for union nut -MP1-227-.
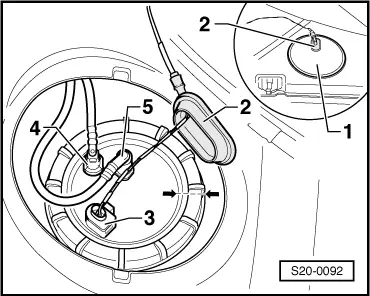
–  Remove the flange of the sender for fuel gauge display -G- and the gasket ring from the opening of the fuel tank.
  Note
If the flange of the sender for fuel gauge display -G- is still filled with fuel, then empty it before replacing.
Install
Installation is carried out in the reverse order. Pay attention to the following:
  Note
t  When inserting the flange of the sender for fuel gauge display -G-, ensure that no damage occurs.
t  Moisten the seal of the flange with fuel before fitting.
t  Make sure the fuel lines fit tightly.
  S20-0099
check fitting position:
t  The marking on the flange must be aligned with the marking on the fuel tank -arrows-.
t  Fuel feed line (black) -1- to connection marked -V-.
t  Fuel return-flow line (blue) -2- to connection marked -R-.
  S20-0098

Removing and installing the sender for fuel gauge displayG > < Fuel filter - Summary of components