skoda Workshop Repair Guides

Skoda Workshop Service and Repair Manuals

Removing and installing engine|Install > < Removing and installing engine
Removing
Removing
  Note
t  The engine is removed downwards together with the gearbox.
t  Jacking up points for raising the vehicle → BookletFabia.
t  Pay attention to the correct assignment of the plugs, if necessary mark.
t  If the battery is disconnected and reconnected, carry out certain additional operations → Electrical System; Rep. gr.27.
Work procedure
–  Disconnect the battery-earth strap with the ignition off.
   
–  Remove noise insulation -arrows-.
–  Unscrew the right and left drive shafts from the gearbox flange → Chassis; Rep. gr.40.
–  Raise drive shafts and secure.
–  Remove pre-exhaust pipe → Chapter.
–  Drain coolant → Chapter.
–  Remove engine cover with air filter → Chapter.
–  Remove battery and battery tray → Electrical System; Rep. gr.27.
  S10-0135
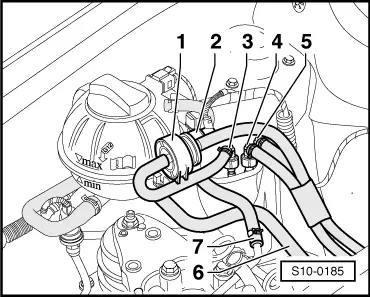
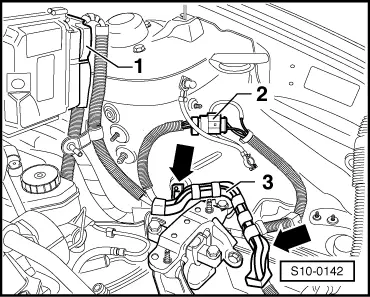
–  Unplug connector -1- from the engine control unit.
–  Disconnect plug connection -2-.
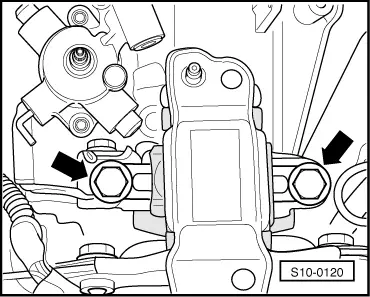
–  Unclip cable clip -3--arrows-.
The engine is removed together with the wiring loom.
–  Disconnect all cables for the engine, gearbox, starter motor and radiator which are will get in the way during removal.
–  Remove the coolant hose which connects the coolant regulator to the heat exchanger.
–  Remove the vacuum hose from the brake servo unit.
  WARNING
The fuel system is under pressure! Before opening the system lay cleaning cloths around the connection point. Reduce pressure by carefully releasing the connection point.
  S10-0142
–  Detach the fuel feed line -5- or fuel return line -4- and ventilation line -3- by pressing on the release buttons → Chapter.
–  Unplug the plug connection -2- and remove solenoid valve for the activated charcoal filter system -N80--1-.
–  Remove the bleeder hose of the cooling system -7- from the front coolant pipe.
–  Remove the coolant hose -6- on the pipe behind the expansion reservoir.
–  Remove Bowden cable support → Gearbox; Rep. gr.34.
–  Remove the slave cylinder of the hydraulic clutch → Gearbox; Rep. gr.30.
–  Separate the coolant hose from the radiator at the top and bottom of the connection fittings.
  S10-0185
–  Unbolt the pendulum support -arrows-.
For vehicles with air conditioning
  WARNING
Do not open the refrigerant circuit of the air conditioning system.
–  Remove V-ribbed belt → Chapter.
–  Remove connector from the AC compressor.
–  Remove AC compressor with the refrigerant lines connected.
–  Fix the AC compressor firmly to the vehicle, in order to avoid damage when removing the unit from the vehicle.
  Note
Do not buckle the refrigerant lines.
Continued for all vehicles
–  Insert engine mount -T30104- into the unit jack, e.g. -V.A.G 1383 A-
  S34-0403
–  Fix engine mount -T30104- to the cylinder block using fixing nuts and bolts M8 with a tightening torque of 30 Nm.
–  Slightly raise the engine and gearbox with the unit jack e.g. -V.A.G 1383 A-.
  S10-0376
–  Unscrew bolts -1-.
  S10-0182
–  Unscrew the screws -arrows- from the gearbox mount.
–  Lower the engine with gearbox.
  Note
When lowering the engine with the gearbox proceed with great care. There must always be enough space in the surrounding area.
Securing the engine to the assembly stand
To perform the assembly work the engine must be secured to the assembly stand -MP9-101-.
  S10-0120
Use a unit jack to guide the engine and gearbox onto the work bench.
Lower the engine in such a way that the gearbox is positioned on the support.
Remove engine/gearbox connecting screws.
–  Remove the gearbox from the engine.
  S10-0377
Hang lifting device -MP9-201- as follows and raise with the workshop crane from the assembly bracket.
  S10-0186
Secure the engine with engine mount -MP1-202- (using 3 screw -arrows-) on the assembly stand -MP9-101- when carrying out assembly work.
  S10-0183

Removing and installing engine|Install > < Removing and installing engine