skoda Workshop Repair Guides

Skoda Workshop Service and Repair Manuals

Inspecting the CV joints > < Removing and installing drive shaft (as of CW 12 2008)
Repairing drive shaft with CV joint
Special tools and workshop equipment required
t  Pressure plate -MP3-406 (VW 401)-
t  Pressure plate -MP3-407 (VW 402)-
t  Pressure spindle -MP3-448 (VW 408 A)-
t  Strutting bushing -MP6-428 (VW 522)-
t  Clamping device -MP6-429-
t  Workshop press, e.g. -V.A.G 1290 A-
t  Tensioning pliers, e.g. -V.A.G 1682-
t  Sealant -D 454 300 A2-
   
Remove the outer CV joint of the drive shaft:
Vehicles up to CW 11 2008
–  Removing drive shaft → Chapter.
Vehicles as of CW 12 2008
–  Removing drive shaft → Chapter.
Continued for all vehicles
–  Clamp the drive shaft in a vice with the protective jaws.
–  Pull back joint boots.
–  Remove the CV joint from the drive shaft using a drift -A-.
The drift must be positioned exactly at the centre of the CV joint.
–  Remove circlip (Pos. 16 → Chapter).
–  Remove the disc spring and thrust ring from the drive shaft.
Remove outer CV joint of the drive shaft:
–  Push the new joint boot onto the drive shaft.
  N40-0442
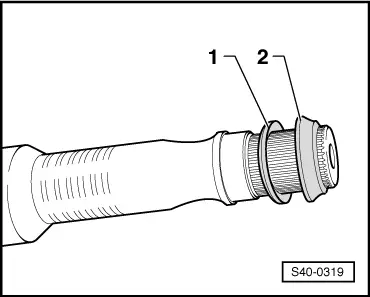
–  Fit the disc spring -1- and the thrust ring -2- onto the drive shaft.
   Pay attention to correct installation position.
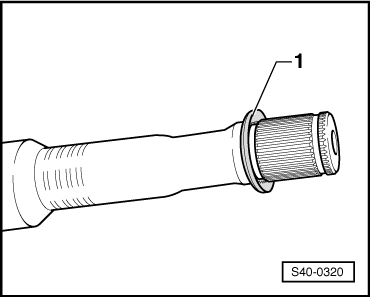
–  Insert new circlip in the groove of the drive shaft.
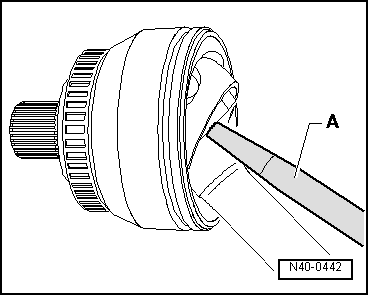
–  Carefully drive CV joint onto the drive shaft with a plastic hammer until the compressed circlip expands.
–  Grease the CV joint and the joint boot → Anchor.
–  Fit joint boot on the outer joint.
  Note
t  
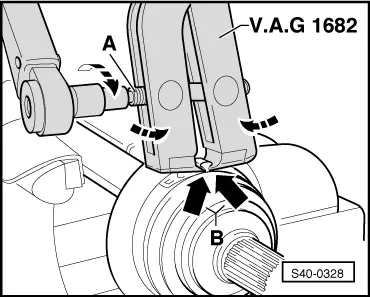
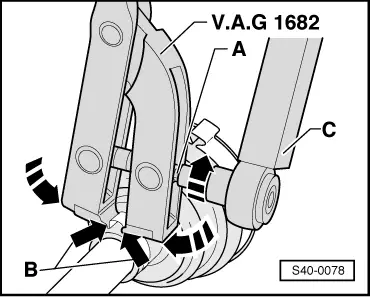
In view of the hard material (as opposed to rubber) of the joint boot, which requires the use of stainless steel open warm-type clamps, these can only be tightened with tensioning pliers, e.g. -V.A.G 1682-.
t  Tightening torque 20 Nm.
t  Ensure that the thread of the spindle -A- of the pliers is smooth. Lubricate if necessary with grease.
t  If it is not smooth, e.g. if the thread is dirty, the necessary clamping force of the open warm-type clamp is not reached at the given torque.
  S40-0319
–  Tighten the open warm-type clamp on the outer joint (at the large diameter).
–  Apply tensioning pliers, e.g. -V.A.G 1682-, as shown Make sure the cutting edges of the pliers are positioned in the corners -arrows B- of the warm-type clamp.
–  Tighten the warm-type clamp by turning the spindle with a torque wrench. Do not tilt the pliers during this process.
A - Spindle of tensioning pliers
B - Cutting edges of tensioning pliers
  S40-0328
–  Tighten the warm-type clamp at the small diameter
–  Apply tensioning pliers, e.g. -V.A.G 1682-, as shown Make sure the cutting edges of the pliers are positioned in the corners -arrows B- of the warm-type clamp.
–  Tighten the warm-type clamp by turning the spindle with a torque wrench. Do not tilt the pliers during this process.
A - Spindle of tensioning pliers
B - Cutting edges of tensioning pliers
C - Torque wrench
Vehicles up to CW 11 2008
–  Install drive shaft → Chapter.
Vehicles as of CW 12 2008
–  Install drive shaft → Chapter.
  S40-0078
Remove the inner CV joint of the drive shaft:
Vehicles up to CW 11 2008
–  Removing drive shaft → Chapter.
Vehicles as of CW 12 2008
–  Removing drive shaft → Chapter.
Continued for all vehicles
–  Open warm-type clamp.
–  Remove joint boot from CV joint with drift.
–  Remove the circlip from the drive shaft.
–  Press CV joint off the drive shaft (fig. S40-0098).
–  Do this while supporting the steering joint.
–  Remove the disc spring from the drive shaft.
  S40-0098
Install the inner CV joint of the drive shaft:
–  Fit the disc spring -1- onto the drive shaft.
   Pay attention to correct installation position.
–  Push the new joint boot onto the drive shaft.
  S40-0320
–  Press CV joint onto the drive shaft up to the stop.
  Note
Chamfer (chamfered edge) on inner diameter of the ball hub (serration) must point towards the bearing collar of the drive shaft.
–  Fit new circlip on the drive shaft. For this use e.g. the circlip pliers -VW 161 A-.
–  Coat the edge of the inner joint boot cap with sealant - D 454 300 A2-.
–  Fit joint boot on the constant velocity joint.
  Note
t  In view of the hard material (as opposed to rubber) of the joint boot, which requires the use of a stainless steel open warm-type clamp, the latter can only be tightened with tensioning pliers, e. g. -V.A.G 1682-.
t  Tightening torque 20 Nm.
  S40-0099
t  Ensure that the thread of the spindle -A- of the pliers is smooth. Lubricate if necessary with grease.
t  If it is not smooth, e.g. if the thread is dirty, the necessary clamping force of the open warm-type clamp is not reached at the given torque.
Vehicles up to CW 11 2008
–  Install drive shaft → Chapter.
Vehicles as of CW 12 2008
–  Install drive shaft → Chapter.
  S40-0328

Inspecting the CV joints > < Removing and installing drive shaft (as of CW 12 2008)