skoda Workshop Repair Guides

Skoda Workshop Service and Repair Manuals

Checking the coolant system for leaktightness > < Draining and filling up coolant
Removing and installing radiator
Special tools and workshop equipment required
t  Pliers for spring strap clamps
Removing
  Note
Collect drained coolant in a clean container for proper disposal or reuse.
–  Drain coolant → Chapter.
–  Pull off coolant hose at the top and bottom of the radiator.
   
–  Disconnect plug -1- from thermoswitch for radiator fan -F18- and plug -2- from radiator fan -V7-.
Vehicles with air conditioning
  WARNING
Do not open the refrigerant circuit of the air conditioning system.
–  Remove front bumper → Body Work; Rep. Gr.63.
–  Remove headlights → Electrical System; Rep. Gr.94.
–  Unscrew screws of brackets for the refrigerant lines at the fan shroud and at the radiator.
  S19-0078
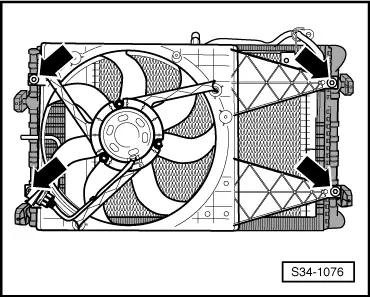
–  Release screws -arrows- and remove fan shroud with fan.
  Note
t  
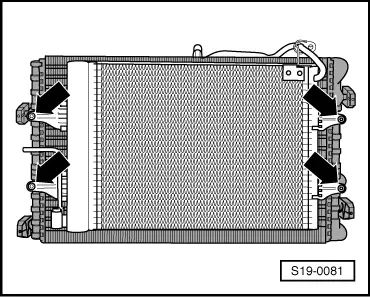
In order to avoid damage to the condenser as well as to the refrigerant lines and hoses, ensure that the lines and hoses are not over-tensioned, kinked or bent.
t  Do not simply suspend AC condenser on the refrigerant lines. Pay attention to a correct suspension or support.
  S34-1076
–  Unscrew fixing screws for AC compressor -arrows- and suspend condenser laterally.
–  Unscrew fixing screws for radiator bearing on right and left.
–  Incline the radiator slightly backwards and pull out upwards.
Vehicles without air conditioning
–  Unscrew fixing screws for radiator bearing on front right and left.
–  Incline the radiator slightly backwards and pull out upwards.
Install
Installation is carried out in the reverse order. Pay attention to the following:
–  Top up coolant → Chapter.
  S19-0081

Checking the coolant system for leaktightness > < Draining and filling up coolant