skoda Workshop Repair Guides

Skoda Workshop Service and Repair Manuals

Removing and installing cylinder head > < Removing and installing cylinder head - Part 2
Removing and installing camshaft housing
Observe safety measures → Chapter.
Observe rules for cleanliness → Chapter.
Special tools and workshop equipment required
t  
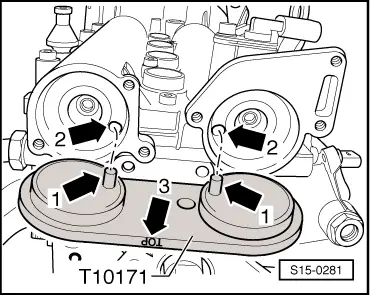
Camshaft fixer/locator -T10171A-
t  Two stud bolts (M6 x 80)
t  Sealant -D 188 003 A1-
t  Sealant remover gasket stripper (bearing code GST, bearing article no. R 34402), manufacturer Retech s.r.o.
t  Cleaning and degreasing agent, e.g. -D 000 401 04-
t  Protective goggles and gloves
Removing
l  The ignition must be switched off and the ignition key must be withdrawn.
  Note
t  On this engine the camshafts are located in the camshaft housing. Before removing the camshaft housing, the timing case must be removed → Chapter.
t  Removing and installing camshafts → Chapter.
t  Do not rework the sealing surface of the camshaft housing.
–  Remove plastic cover for camshaft housing.
–  Remove timing case → Chapter.
–  Position the crankshaft on TDC for cylinder 1, turn back the crankshaft approx. 45° in the opposite direction of rotation of the engine and remove the camshaft chain sprockets with the timing chain → Chapter.
–  Unscrew earth cable from camshaft housing.
–  Removing ignition coils → Chapter.
–  Remove cable guide with wiring loom from camshaft housing.
–  Pull out oil dipstick.
–  Removing the intake manifold → Chapter.
–  Unscrew left lifting eye.
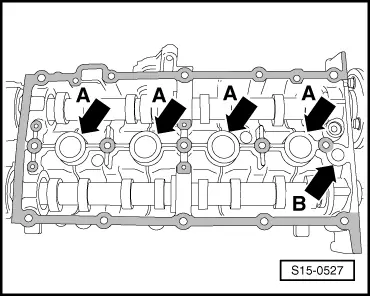
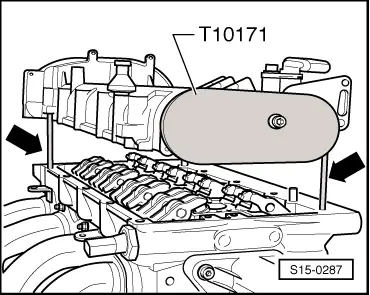
–  Slacken the bolts of the camshaft housing crosswise from the outside to the inside.
–  Release screws and remove camshaft housing.
Install
Condition
l  The pistons must not be positioned at top dead centre.
  WARNING
Wear protective googles and gloves when working with sealant and grease remover!
–  Remove residual sealant on the cylinder head and camshaft housing using a chemical sealant remover.
  Note
Ensure that no dirt and sealant residues get into the cylinder head or camshaft housing.
   
–  Turn the inlet and outlet camshaft until the camshaft fixer/locator -T10171A- can be inserted up to the stop into the holes of the camshafts.
–  To secure the camshaft fixer/locator -T10171A- screw in M6 screw by hand; do not tighten.
–  Carefully clean and degrease the sealing surfaces. They must be free of oil and grease.
  S15-0281
–  Replace oil strainer -1- and insert in the cylinder head.
–  Insert 4 new gasket rings -2- into the grooves of the cylinder head.
  A15-10551
–  Ensure that all the roller arms are correctly positioned on the valve stem ends -1- and are clipped in place on the relevant hydraulic supporting elements -2-.
–  Screw in two stud bolts (M6 x 80) into the cylinder head before fitting on the camshaft housing.
  S15-0528
–  Apply a thin coating of sealant uniformly on the clean sealing surface of the camshaft housing (see grid surface in the illustration).
–  Do not apply sealant in the area of the -arrows A-. Here the cylinder head is sealed with the inserted gasket rings.
  Note
t  No sealant must be applied in the area -arrow B-. Here the oil strainer seals.
t  The sealant must not be applied too thickly, as otherwise excess sealant may penetrate into the oil bores and possibly cause engine damage.
  S15-0527
–  Carefully place the camshaft housing vertically from above onto the cylinder head stud bolts -arrows- and dowel pins.
  Note
Make sure that no residues of oil drop down onto the sealing flange and the camshaft housing does not tilt.
–  Tighten the new fixing screws of the camshaft housing diagonally and evenly from the inside to the outside.
   Tightening torque: 10 Nm + torque a further 90° (1/4 turn)
  Note
After installing the camshaft housing, allow the sealant to dry for about 30 minutes.
–  Setting the timing → Chapter.
Further installation occurs in a similar way in reverse order to removal. Pay attention to the following:
t  Install timing case → Chapter.
t  Pay attention to the required measures after connecting the battery → Electrical System; Rep. Gr.27.
t  Interrogate fault memory, rectify any faults existing and erase the fault memory → Vehicle diagnosis, testing and information system VAS 5051.
  S15-0287

Removing and installing cylinder head > < Removing and installing cylinder head - Part 2