Fabia Mk2
| Disassembling and assembling (Climatic) the air conditioning unit |
 Note
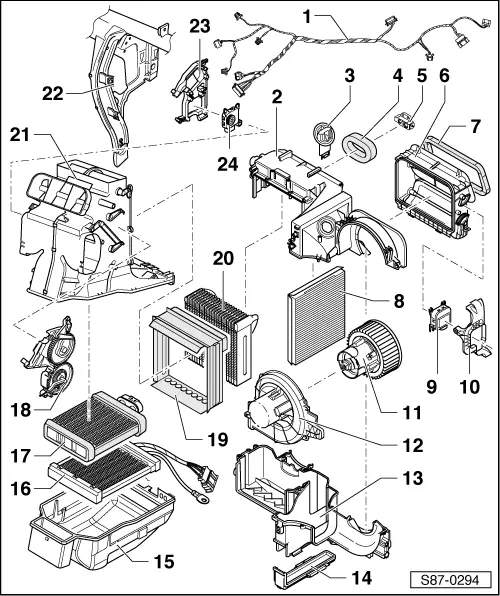
Note| Connection elements of the air conditioning unit → Fig. |

| 1 - | Wiring loom of air conditioning unit |
| q | carefully cut open to remove cable strap |
| q | when installing new cable strap fit in same location |
| 2 - | Top part evaporator housing |
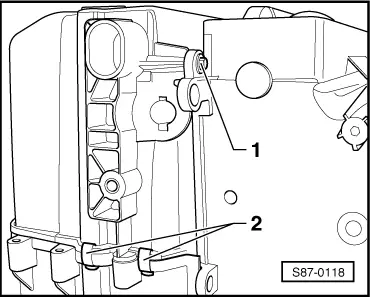
| q | Top part - bottom part connection with screws and retaining clips → Fig. |
| 3 - | Fresh air blower series resistor -N24- |
| q | removing and installing → Chapter |
| 4 - | Foam seal |
| q | replace if damaged |
| q | self-adhesive |
| q | stuck onto evaporator housing |
| q | before fitting remove glue residues on housing with acetone |
| 5 - | Expansion valve |
| q | Summary of components → Chapter |
| q | removing and installing → Chapter |
| 6 - | Air inlet housing |
| q | with fresh and re-circulating air flap |
| q | Fitted to housing top and bottom part with retaining clips → Fig. |
| 7 - | Gasket |
| q | replace if damaged |
| q | self-adhesive |
| q | before fitting remove glue residues on housing for air inlet with acetone |
| 8 - | Dust and pollen filter |
| q | also as combination filter with odour filter |
| q | removing and installing → Chapter |
| 9 - | Fresh air flap and re-circulating air flap control motor -V154- |
| q | with installed potentiometer for re-circulating air flap control motor -G143- |
| q | clipped into the bracket |
| q | removing and installing → Chapter |
| 10 - | Holder for fresh air flap and re-circulating air flap control motor -V154- |
| 11 - | Fresh air blower -V2- |
| q | removing and installing → Chapter |
| 12 - | Holder for fresh air blower -V2- |
| q | remove holder for fresh air blower → Chapter |
| 13 - | Evaporator housing - bottom part |
| q | Top part - bottom part connection with screws and retaining clips → Fig. |
| 14 - | Filter cover |
| 15 - | Bottom part of distributor housing |
| 16 - | Heating element for air auxiliary heating -Z35- |
| q | removing and installing → Chapter |
| 17 - | Heat exchanger |
| q | removing and installing → Chapter |
| 18 - | Positioning unit for air distribution flaps |
| q | removing and installing → Chapter |
| 19 - | Seal for evaporator |
| q | Observe installation position: Water drain openings must point downwards |
| q | as of 01.07, replaced by tape made of PUR foam, which is stuck onto the circumference of the evaporator |
| 20 - | Evaporator |
| q | removing and installing → Chapter |
| 21 - | Air distributor housing, top part |
| q | Connection with air distributor housing, bottom part with retaining clips |
| 22 - | Support |
| q | inseparable component of the central pipe, screwed connection to air conditioning unit and centre console support |
| q | Tightening torque of the air conditioning unit: 5 Nm |
| q | Centre console support tightening torque: 10 Nm |
| 23 - | Support |
| q | for temperature flap control motor -V68- |
| q | no longer fitted as of CW 46.2010 |
| 24 - | Control motor for temperature flap -V68- |
| q | up to CW 45.2010 - Control motor for temperature flap -V68- (flap operated via control motor) |
| – | with installed potentiometer for temperature flap control motor -G92- |
| – | Removing and installing control motor → Chapter |
| q | as of CW 46.2010, temperature flap mechanically operated via flex shaft |
| – | Remove and install the positioning unit for temperature flap → Chapter |
| – | Remove and install flex shaft → Chapter |

