skoda Workshop Repair Guides

Skoda Workshop Service and Repair Manuals

Removing and installing the oil filter holder with the engine oil cooler > < Oil filter holder and engine oil cooler - Summary of components
Removing and installing oil pan
Special tools and workshop equipment required
t  Socket insert -T10058-
t  Old oil collecting and suction equipment, e.g. -V.A.G 1782-
t  Silicone sealant -D 176 501 A1-
t  Sealant remover gasket stripper (bearing code GST, bearing article no. R 34402), manufacturer Retech s.r.o.
t  Cleaning and degreasing agent, e.g. -D 009 401 04-
t  Protective goggles and gloves
Removing
–  Remove the sound dampening system → Body Work; Rep. gr.50.
–  Remove the right wheelhouse liner → Body Work; Rep. gr.66.
  Note
It is necessary to observe the oil disposal instructions.
–  Drain engine oil.
   
–  Disconnect plug -arrow- at oil level and oil temperature sender -G266-.
  A17-0215
–  Remove noise insulation -2- for oil pan.
To do this:
t  Unscrew bolts -1-.
t  Remove 2-part clips -arrows-.
t  Remove the attachment of the cable on the noise insulation.
–  Release screw -3-.
  S17-0206
–  Screw out screws -arrows- for oil dipstick guide pipe.
–  Pull out the oil dipstick guide pipe upwards.
  N17-10220
–  Screw out screws -arrows- of oil pan/gearbox.
–  Release the screws -1 … 16- of the oil pan with the socket insert -T10058- crosswise.
–  Remove oil pan, if necessary release by applying slight blows with a rubber-headed hammer.
Install
l  The sealing flange on the belt pulley side was not replaced.
Install oil pan, if the sealing flange on the belt pulley side was replaced → Chapter.
  Caution
The sealing flange on the belt pulley side is made of plastic and has an integrated silicone seal. In order to reliably seal the oil pan on the sealing flange, from which the silicone seal was removed, the following work procedure must absolutely be kept.
  WARNING
Wear protective gloves when working with sealant and grease remover!
–  Remove residual sealant from the sealing surfaces on the cylinder block and on the oil pan with chemical sealant remover.
  N17-10214
–  Remove residual sealant and silicone seal -arrows- at the old sealing flange on the belt pulley side with chemical sealant remover.
  Note
  N17-10239
Pay attention to the use by date of the silicone sealant -D 176 501 A1-.
–  Cut off nozzle tube at the front marking (Ø of nozzle approx. 3 mm).
–  Apply the silicone sealant -D 176 501 A1- to the clean sealing surface of the oil pan, as shown.
l  The sealant must be run past on the inside in the area of the bolt holes -arrows-.
  Caution
Risk of blockage of the lubrication system through excess sealant.
Do not apply a thicker sealant bead than indicated.
  Note
The bottom surface of the sealing flange on the belt pulley side has a displacement of approx. 1 mm to the bottom cylinder block surface after removing the old silicone seal, which must be compensated for by applying the required sealant on the corresponding area of the oil pan sealing surface.
  N17-0019
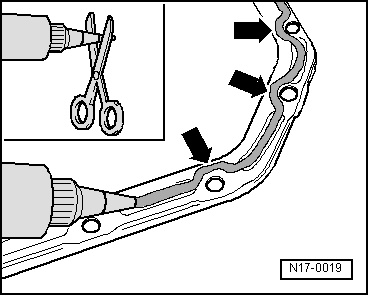
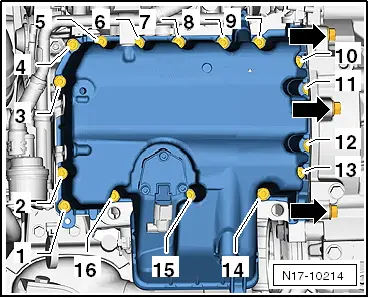
Thickness of sealant beads on the oil pan:
t  In the area of the sealing surfaces of the cylinder block and the sealing flange on the gearbox side -between arrows 1-: 2 … 3 mm
t  In the area of the sealing surface of the sealing flange on the belt pulley side -between arrows 2-: 3 … 4 mm
l  The old silicone seal, which is no longer present, must be replaced in the area of the sealing flange on the belt pulley side with the sealant bead equal to the height and width of the silicone seal.
  Note
After applying the sealant, install the oil pan within 5 minutes.
–  Position oil pan.
  Note
t  
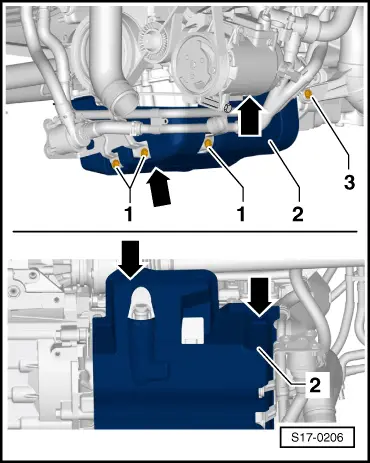
The oil pan must be flush to the gearbox flange at the intermediate plate.
t  When installing the oil pan with the engine removed, ensure that the oil pan is flush with the cylinder block at the flywheel side.
  S17-0208
–  Tighten the screws of the oil pan in 3 stages as follows.
  N17-10214
StageScrewsTightening torque
1-1 … 16-crosswise to 5 Nm
2 1-Arrows-40 Nm
3-1 … 16-crosswise to 15 Nm

1) When installing the oil pan on a removed engine, this work step is not carried out. Make sure however that the pan is flush with the cylinder block on the flywheel side.
The further assembly is carried out in the reverse order, while paying attention to the following:
  Note
After installing the oil pan, allow the sealant to dry for about 30 minutes. Only then may engine oil be filled in.
–  Fill with engine oil and check the oil level.
t  → BookletFabia II.
t  → BookletRoomster.
   

Removing and installing the oil filter holder with the engine oil cooler > < Oil filter holder and engine oil cooler - Summary of components