| Installing the high pressure lines |
| Special tools and workshop equipment required |
| t
| Socket wrench insert -T40055- |
| t
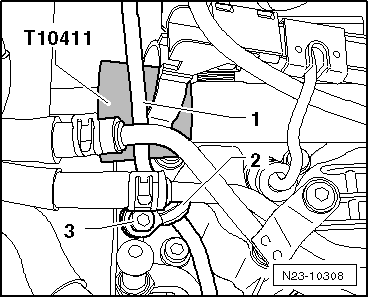
| Assembly sleeve -T10411- |
| t
| Cleaning and degreasing agent, e.g. -D 009 401 04- |
| t
| Protective goggles and gloves |
| Observe safety measures and rules of cleanliness when undertaking all work on the fuel system → Chapter. |

Caution | t
| For easier installation of the fuel high pressure pipe, release the tension of the fuel distributor. If necessary, slightly push the fuel distributor. |
| t
| For easier installation of the injection pipes, release the tension of the fuel distributor as well as the clamping claws of the injection units. If necessary, slightly push the fuel distributor and slightly twist the relevant injection unit. |
| t
| The pipes must on no account be bent or installed when under tension. The installation tension can lead to fracture of the fuel high pressure pipe. |
|

Note | t
| It is not allowed to use tools for aligning the fuel distributor/the injection units. |
| t
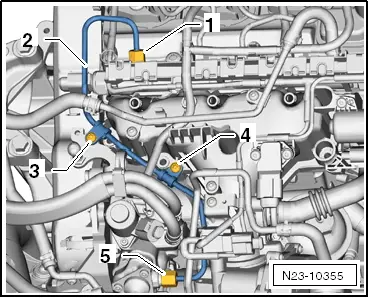
| Pay attention to the cylinder specific marking when re-using the high pressure lines. |
| t
| The high pressure lines can be re-used if: |
| l
| The sealing cone of the relevant high pressure line is not deformed or cracked. |
| l
| The line boring is not deformed, constricted or damaged. |
| t
| Corroded lines must no longer be installed. |
| –
| Suction off dirt from the sealing cones of the supports at the fuel distributor. |

WARNING | Wear protective gloves and protective googles when working with grease remover! |
|
| –
| Clean fuel lines and line connections and blow-dry with compressed air. |
| –
| Coat threads of union nuts with fuel. |
| –
| First position the injection lines from the fuel distributor to the injection units free of tension and only tighten the union nuts by hand. |
| –
| Tighten the screws for the clamping claws of the injection units to 8 Nm and torque a further 180° (1/2 turn). |
| –
| Use the socket wrench insert 17 mm -T40055- to tighten the union nuts of the high pressure lines first on the injection units and then on the fuel distributor to 15 Nm and torque a further 60° (1/6 turn). |
|
|
|