skoda Workshop Repair Guides

Skoda Workshop Service and Repair Manuals

Enginecrankshaft group, pistons > < Assembly bracket
Removing and installing engine support
(Fabia II, Roomster, Rapid)
Special tools and workshop equipment required
t  
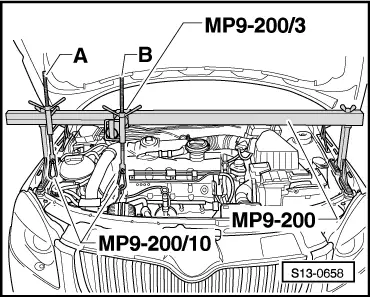
Supporting device -MP9-200 (10-222A)-
Removing
  Caution
When undertaking all installation work, particularly in the engine compartment due to its cramped construction, please observe the following:
t  Lay lines of all kinds (e.g. for fuel, hydraulic fluid, cooling fluid and refrigerant, brake fluid, vacuum) and electrical lines in such a way that the original line guide is re-established.
t  In order to avoid damage to the cables, ensure that there is adequate free access to all moving or hot components.
  Note
t  Safety precautions when working on the fuel supply system → Chapter.
t  Observe rules for cleanliness → Chapter.
–  Switch off ignition and withdraw ignition key.
–  Remove engine cover → Chapter.
For vehicles Fabia II, Roomster
   
–  Remove vacuum line from brake servo unit -arrow-.
For vehicles Rapid
  A10-10031
–  Separate the vacuum line behind the bracket at the cylinder head -arrow 1-.
Continued for all vehicles
  N15-10539
–  Install supporting device -MP9-200 (10-222A)- and support the engine with spindle -B- in fitting position. Allow spindle -A- to hang loosely.
  Note
t  The assembly bracket must only be removed if the engine is supported with the supporting device -MP9-200 (10-222A)-!
t  Only release the engine support if the assembly bracket is removed.
–  Remove the front right wheelhouse liner → Body Work; Rep. gr.66.
  S13-0658
–  Separate fuel feed line -2- and fuel return-flow line -1-, to do so press the release buttons. Unlock the quick coupling and disconnect → Chapter.
–  Collect the fuel which flows out with a cloth.
For vehicles Fabia II, Roomster
  A20-1118
–  Unlock the catch peg with a finger and pull the fuel preheating valve upwards out of the guide of the coolant expansion bottle.
For vehicles Rapid
  N20-10638
–  Unlock the catch peg with a finger and pull the T-piece upwards out of the guide from the coolant expansion bottle.
Continued for all vehicles
–  Unclip the fuel line from the plastic holders.
  N20-10841
–  Push the catch pegs up and remove the fuel filter towards the top.
–  Place the fuel filter and the fuel hoses together with the fuel preheating valve on the engine.
–  Remove fuel filter bracket.
–  Slacken the coolant expansion bottle in such a way that there is sufficient space for the removal of the engine support.
  N20-10636
–  Remove top part of toothed belt guard; to do so release retaining clips -arrows-.
–  Remove the earth connection from the assembly bracket.
For vehicles Fabia II, Roomster
  N15-10405
–  Release fixing screws of assembly bracket/engine support -3-, assembly bracket/body -2- and remove the complete assembly bracket.
For vehicles Rapid
  S10-0444
–  Release fixing screws of assembly bracket/engine support -B-, assembly bracket/body -A- and remove the complete assembly bracket.
Continued for all vehicles
  N10-10535
–  Release screws -1 ... 3- and remove pendulum support.
  WARNING
Make sure that no components/hoses are damaged, overstretched or torn off when lifting and lowering the engine with the supporting device -MP9-200 (10-222A)-.
–  Pull the engine as far as possible towards the radiator.
  Note
  S10-0269
Remove the fixing screw -1- together with the engine support. Raise the engine and lower it via the spindle of the supporting device -MP9-200 (10-222A)- so that the screws -2- and -3- can be removed or inserted.
–  Unscrew the fixing screws for the engine support in the sequence -3 - 2 - 1-.
–  Remove the engine support upwards.
Install
  Caution
The tightening sequence and the tightening torque of the fixing screws for the engine support must definitely be respected. Otherwise stress of the engine support occurs, which results in the breaking of the engine support.
Installation occurs in reverse order. However, pay attention to the following:
–  Place the engine support from the top.
  Note
  N13-10321
Install the fixing screw -1- together with the engine support. Raise the engine and lower it via the spindle of the supporting device -MP9-200 (10-222A)- so that the screws -2- and -3- can be removed or inserted.
–  Tighten the fixing screws in the sequence -1 - 2 - 3- to 7 Nm.
–  Torque the fixing screws in the sequence -1 - 2 - 3- to 40 Nm + a further 180° (1/2 turn).
–  Install engine mounting with new screws.
–  Tighten screws for engine mount:
t  Fabia II, Roomster → Chapter.
t  Rapid → Chapter.
Further installation occurs in reverse order. However, pay attention to the following:
t  Make sure the fuel lines fit tightly.
t  Do not mix-up the feed line and the return-flow line (the return-flow line is blue or has a blue marking, the feed line is black).
  N13-10321

Enginecrankshaft group, pistons > < Assembly bracket