skoda Workshop Repair Guides

Skoda Workshop Service and Repair Manuals

Removing and installing flywheel > < Replacing crankshaft seal on belt pulley side
Tightening process of the screw for crankshaft belt pulley
Special tools and workshop equipment required
t  Counterholder -T30004 (3415)-
t  Bolt -T30004/1 (3415/1)-
Conditions
l  Timing o.k.
l  Gasket ring for crankshaft in timing case removed.
  Note
t  For attaching the crankshaft belt pulley, use the repair set → Electronic Catalogue of Original Parts.
t  A spacer sleeve and two diamond coated washers with different inner diameters belong to the repair kit.
t  Both diamond coated washers prevent the crankshaft from turning when tightening the fixing screw.
   
Fitting position of the parts for the repair kit
1 - Fixing screw
2 - Crankshaft-belt pulley
3 - Diamond coated washer with 19 mm inner diameter (part of the repair set)
4 - Spacer sleeve (part of the repair set)
5 - O-ring in the bushing
6 - Diamond coated washer with 23 mm inner diameter (part of the repair set)
–  Remove camshaft housing plastic cover and intake hose to air filter housing.
–  Remove cap of outlet camshaft. Collect any engine oil which flows out with a cloth.
  Note
Observe that all clamping surfaces of the fixing screw for the crankshaft belt pulley to the crankshaft chain sprocket are free of oil and grease.
  S13-0684
–  First of all push a new spacer sleeve -3- and washer (inner diameter 23 mm) -2- onto the fixing screw -1-.
–  Screw the fixing screw -1- by about 2 turns into the crankshaft.
–  Push the washer -2- and the bushing -3- onto the crankshaft journal up to the stop.
–  Release fixing screw (at the same time press the spacer sleeve against the crankshaft).
–  Install the new gasket ring for the crankshaft → Chapter.
–  Slightly oil the first third of the thread of the new fixing screw.
  N13-10131
–  Screw in new fixing screw -1- with crankshaft belt pulley -2- and washer -3- (inside diameter 19 mm) into the crankshaft journal.
   The washer -3- muss rest against the collar of the crankshaft belt pulley -2-.
Always use a new fixing screw -1-.
  N13-10134
–  Insert counterholder -3415- with the bolt -3415/1- into the holes of the crankshaft belt pulley, support counterholder at track control arm -A- and secure in this position with a cable strap. Tighten cable strap.
–  Tighten fixing screw for crankshaft belt pulley to the 1st step as follows:
Tightening torque: 150 Nm
  M13-0230
–  Now mark the position of the outlet camshaft -1- to the camshaft housing -2- with a felt-tip pen. The position of the hole -3- is of no importance for the following inspection.
  M15-0210
–  Mark at this stage the position of the fixing screw -3- to the crankshaft belt pulley -1--arrows-. The marking must not be performed on the washer -2-, because it does not turn along when tightening.
–  Tighten fixing screw for crankshaft belt pulley to the 2nd step as follows:
Torque screw a further 180° (1/2 turn).
   Tightening may occur in successive stages.
  M13-0232
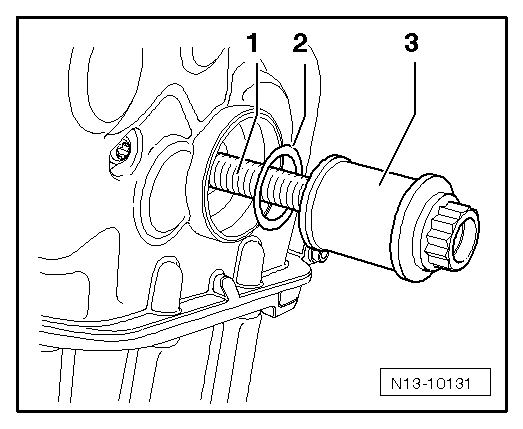
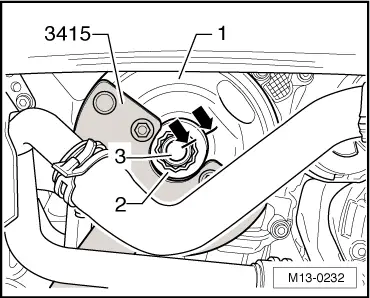
–  Check the position of the outlet camshaft.
l  
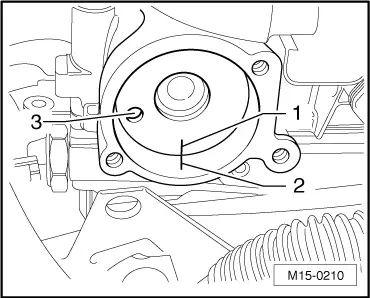
Both markings -1- and -2- must be aligned.
If both markings -1- and -2- are aligned:
–  Test timing → Chapter.
   This checks if the chain sprocket on the crankshaft has turned along when tightening the screw for the crankshaft belt pulley.
If both markings -1- and -2- are not aligned:
–  Test timing:
t  Version A → Chapter.
t  Version B → Chapter.
If the timing is not correct:
–  Setting the timing:
t  Version A → Chapter.
t  Version B → Chapter.
  Note
First of all determine if the peg of the chain sprocket is still in the slot of the crankshaft.
–  If the peg of the chain sprocket is no longer in the slot of the crankshaft, remove the chain sprocket and inspect for damage.
   Replace the damaged chain sprocket.
If the timing is correct:
   The crankshaft has turned to the crankshaft belt pulley.
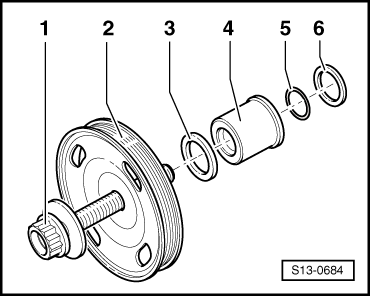
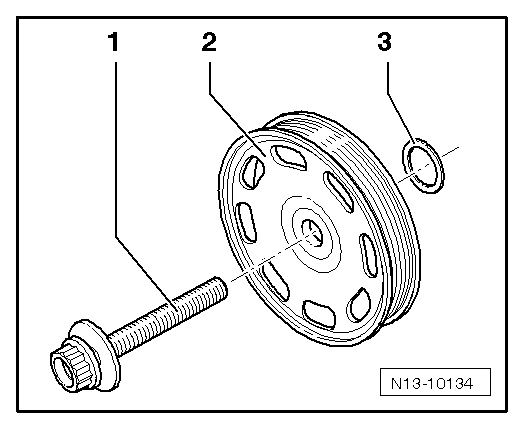
–  Remove the crankshaft belt pulley, gasket ring, diamond coated washers and spacer sleeve, thoroughly clean all component parts. They must be free of oil and grease.
–  Replace damaged component parts.
–  Also throughly clean the clamping surface on the chain sprocket.
–  Re-install component parts with new screw for crankshaft belt pulley.
  M15-0210

Removing and installing flywheel > < Replacing crankshaft seal on belt pulley side