
Octavia Mk1
 Note
Note
|
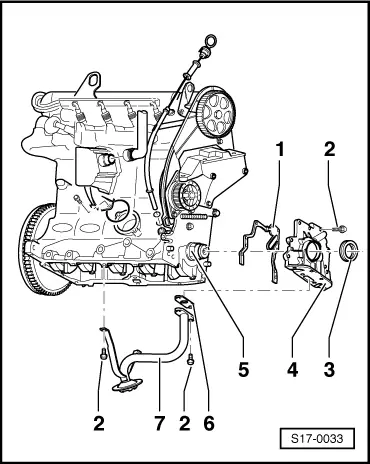
| 1 - | Cap |
| q | Replace seal if damaged |
| 2 - | Oil pressure switch (0.05 MPa) -F1-, 20 Nm |
| q | Switch range 0.03 ... 0.06 MPa |
| q | Identification: green |
| q | check → Chapter |
| q | Replace seal if damaged |
| 3 - | Guide tube |
| 4 - | Filler funnel |
| q | Remove for extracting oil |
| 5 - | Dipstick |
| q | oil level must not exceed max. marking! |
| 6 - | Camshaft sprocket |
| q | take note of the position when installing the timing belt → Chapter |
| 7 - | Oil filter |
| q | slacken with tensioning strap |
| q | Lightly oil gasket |
| q | 20 Nm |
| q | after topping up with oil, check for leaks |
| 8 - | Sprocket |
| 9 - | Tensioning pulley |
| q | Tensioning toothed belt → Chapter |
| 10 - | 20 Nm |
| 11 - | Timing belt |
| q | before removing mark running direction |
| q | check for wear |
| q | do not kink |
| q | removing and installing, tensioning → Chapter |
| 12 - | Timing belt guard - top part |
| 13 - | Timing belt guard - bottom part |
| 14 - | 20 Nm |
| 15 - | 90 Nm + torque a further 1/4 turn (90°) |
| q | replace |
| q | insert oiled |
| 16 - | Belt pulley |
| 17 - | Timing belt gear - crankshaft |
| q | take note of the position when installing the timing belt → Chapter |
| q | as of engine No. 210158 modified version, pay attention to the part number |
| 18 - | 10 Nm |
| 19 - | Gasket ring |
| q | replace → Chapter |
| q | as of engine No. 210158 modified version, pay attention to the part number |
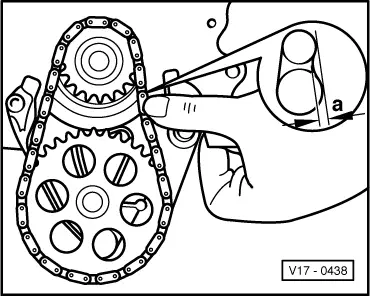
| 20 - | Sealing flange/oil pump |
| q | as of engine No. 210158 with integrated oil pump ⇒ Fig. 4 |
| q | Removing and installing oil pump → Chapter |
| 21 - | Gasket |
| q | replace |
| 22 - | Sealing bush |
| q | replace if damaged |
| q | oil before assembly |
| q | first insert into sealing flange |
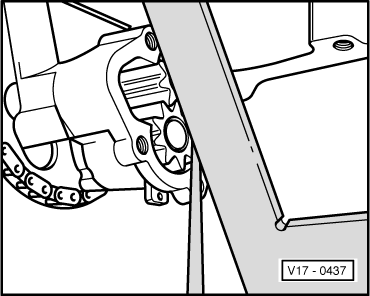
| 23 - | Chain |
| q | tensioning → Fig. |
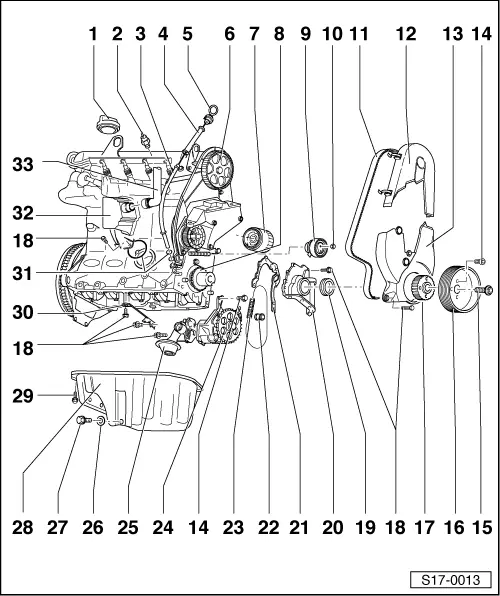
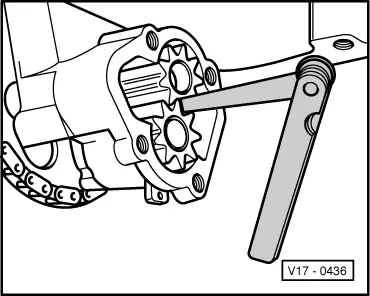
| 24 - | Oil pump |
| q | Version up to engine No. 210157 |
| q | Check tooth flange clearance → Fig. |
| q | inspecting axial play → Fig. |
| 25 - | Oil pump cover with pressure relief valve |
| q | Opening pressure: 4 ... 5 bar (0.40 ... 0.50 MPa) overpressure |
| q | Clean strainer if dirty |
| 26 - | Gasket ring |
| q | replace |
| 27 - | Oil drain plug, 20 Nm |
| 28 - | Oil pan |
| q | clean sealing surface before installing |
| 29 - | 15 Nm |
| 30 - | Support |
| 31 - | “O” ring |
| q | replace |
| 32 - | Oil separator |
| 33 - | Ventilation hose |
| q | To air filter |
|
|
|
|
|
|
|
|