skoda Workshop Repair Guides

Skoda Workshop Service and Repair Manuals

Testing fuel pump > < Removing and installing the fuel gauge sender G
Removing and installing fuel tank for vehicles with four-wheel drive
Special tools and workshop equipment required
t  Engine/gearbox jack, e.g. V.A.G -1383 A-
t  Fuel suction device, e.g. -VAS 5190-
Removing
–  Empty fuel tank with fuel extraction device, e.g. -VAS 5190 -.
–  Fold right rear seat forwards → Body Work; Rep. Gr.72.
–  Unscrew the cover of the fuel gauge sender.
–  Disconnect plug for fuel gauge.
–  Remove filler flap unit with rubber sleeve → Body Work; Rep. Gr.55.
–  Removing the rear right wheel.
–  Remove the rear right wheelhouse liner → Body Work; Rep. Gr.66.
–  Release 2 screws for tank filler neck from wheelhouse.
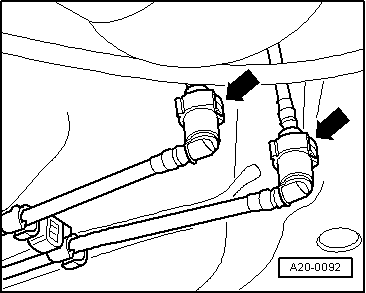
–  Disconnect 2 right front fuel hoses at fuel tank:
   
–  To do so press down the unlocking button on the quick coupling -arrows-.
t  black = intake hose
t  blue = return-flow hose
–  Remove exhaust pipes (without front exhaust pipe) → Chapter.
–  Remove rear part of propshaft → Gearbox; Rep. Gr.39.
  A20-0092
–  Unscrew lower fixing screw -arrow- from shock absorber and anti-roll bar on both vehicle sides.
–  Disconnect plug connections from ABS and Haldex coupling.
–  Disconnect ventilation hoses of the Haldex coupling.
–  Position the engine and gearbox jack under the rear differential gear, e.g. V.A.G -1383 A-, for support.
  S20-0081
–  Remove screws on the rear axle -arrows-.
–  Slowly swivel out rear axle by lowering the lift platform.
–  Remove protection plate for fuel tank.
–  Release 2 screws of the tank mounting.
  S20-0082
–  Slacken screws from fuel tank on the straps -arrows-.
–  Lower the fuel tank.
Install
Installation is carried out in the reverse order.
  S20-0083

Testing fuel pump > < Removing and installing the fuel gauge sender G