skoda Workshop Repair Guides

Skoda Workshop Service and Repair Manuals

Removing and installing the tandem pump > < Procedure
Checking tightness (inside)
  Note
After re-installing an already used tandem pump e.g. after changing or repairing a cylinder head and/or after changing an engine without component parts, the tandem pump must be checked for internal tightness between fuel and oil part. In case of leakage fuel and oil can be mixed, which can cause an engine damage.
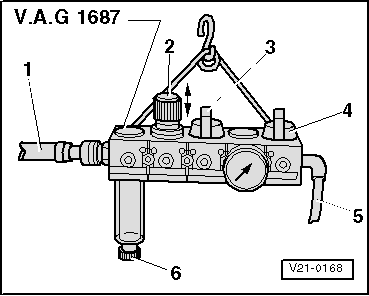
Special tools and workshop equipment required
t  Tester (e. g. -V.A.G 1687-)
Procedure
–  Disconnect the fuel feed hose (white marking) and the fuel return hose (blue marking) from the tandem pump.
–  Close fuel return-flow connection at tandem pump with a plug. Secure plugs with spring strap clips.
Prepare tester -V.A.G 1687- as follows:
   
–  Unscrew pressure control valve -2- fully and close the valves -3- and -4-.
–  Connect tester -5- with a commercially available connection for compressed air und a piece of fuel hose to the fuel feed connection for the tandem pump. To secure, use spring strap clamp.
  Note
The rotary knob must be pulled slightly to the top in order to rotate the pressure control valve -2-.
–  Connect hose with compressed air -1- (compressed air supply) to tester -V.A.G 1687-.
  Note
If there is water in the transparent water drain reservoir, drain water via the drain plug -6-.
–  Open valve -3-.
–  Set the pressure to 0.1 MPa (1.0 bar) with the pressure control valve -2-.
  WARNING
The maximum test pressure is 0.13 MPa (1.3 bar) and it must not be exceeded.
  V21-0168
–  Open valve -4- and wait until the test circuit is filled up. If necessary readjust pressure to 0.1 MPa (1.0 bar).
–  Close valve -3- for pressure maintenance and observe the drop in pressure for 1 minute.
If the pressure does not drop, the tandem pump can be re-used; in case of drop in pressure the tandem pump must be replaced.
  V21-0168

Removing and installing the tandem pump > < Procedure