
Octavia Mk1
 Note
Note
|
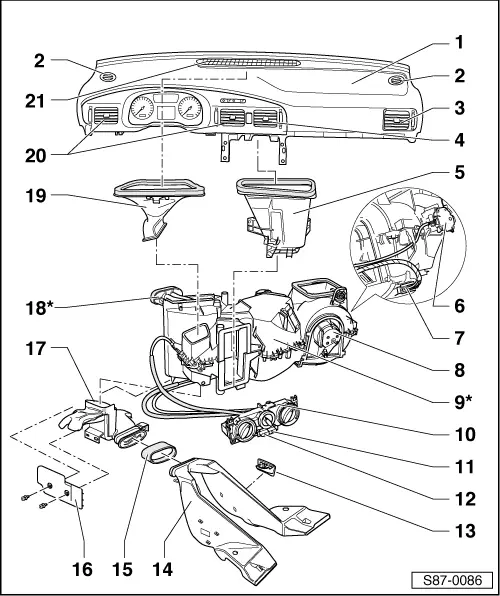
| 1 - | Dash panel |
| t | Removing and installing → Body Work; Rep. Gr.70 |
| 2 - | Outer dash panel vent |
| t | clipped into place |
| 3 - | “Right” dash panel vent |
| t | removing and installing → Chapter |
| 4 - | “Centre, right” dash panel vent |
| t | removing and installing → Chapter |
| 5 - | Air guide duct to the dash panel vents |
| t | screwed to the heating, locked on the top |
| 6 - | Fresh air flap and re-circulating air flap control motor -V154- |
| t | Inspect proper operation → Chapter |
| t | removing and installing → Chapter |
| 7 - | Series resistor for fresh air blower with overheating fuse -N24- |
| t | removing and installing → Chapter |
| 8 - | Fresh air blower -V2- |
| t | removing and installing → Chapter |
| 9 - | Air conditioning unit* |
| t | removing and installing → Chapter |
| t | Remove Bowden cables, install and adjust → Chapter |
| t | Connection diagram for the Bowden cables → Chapter |
| t | disassembling and assembling → Chapter |
| 10 - | Heater control |
| t | removing and installing → Chapter |
| t | Remove and install Bowden cables → Chapter |
| t | Adjust Bowden cables → Chapter |
| t | Connection diagram for the Bowden cables → Chapter |
| t | Replace light bulb → Chapter |
| 11 - | Switch for fresh air and re-circulating air flap -E159- |
| t | Inspect proper operation → Chapter |
Note| t | The switch is firmly attached to the heater control. |
| t | During the “defrosting operation” no re-circulating air operation is possible (approx. 15° before the rotary switch for air distribution reaches the final setting “air guide to front windscreen”, the re-circulating air operation is switched off). |
| 12 - | Switch for air conditioning system -E35- |
Note| t | The switch is firmly attached to the heater control. |
| t | Perform the functional test according to the current flow diagram. |
| 13 - | Footwell vent front passenger side |
| 14 - | Rear duct |
| 15 - | Connecting piece to rear duct |
| 16 - | Left cover for footwell vent |
| 17 - | Footwell vent |
| t | removing and installing → Chapter |
| 18 - | Heat exchanger* |
| t | removing and installing → Chapter |
| t | for vehicles with mapped cooling on the basis of higher temperatures in an all-metal version |
| 19 - | Air guide duct to the defroster vents |
| t | removing and installing → Chapter |
| 20 - | “Left” and “centre, left” dash panel vent |
| t | removing and installing → Chapter |
| 21 - | Defroster vent "windscreen" |